Installation
A Ready Five Enterprise installation takes about 30 minutes, assuming you have an AWS account and the required permissions. It's a set-it-and-forget-it kind of setup though, once it's configured there is no ongoing maintenance.
Prepare your AWS account
We recommend creating a dedicated AWS account for your Ready Five installation. Doing so helps track Ready Five specific costs specifically and creates a permissions boundary between Ready Five resources and other AWS resources under your control.
If you already have an AWS account and want to add another, you may want to familiarize yourself with AWS Organizations, which simplifies multi-account management and governance.
You must be an administrator in the target AWS account to perform the installation.
Can I use an existing AWS account?
Absolutely. A dedicated account is recommended (though not required) because the installation creates a lot of resources across a collection of AWS services. The Ready Five Enterprise installation is created using CloudFormation and can be deleted without leaving anything behind, but having a dedicated account ensures resource isolation.
Choose a region
AWS has datacenters around the world and a collection of datacenters in an area is called a region. If you're already using AWS, you have resources running in one or more regions. We highly suggest choosing a region that is not the region used for your primary services, but is relatively close in physical proximity to you and your other services. This ensures that a regional issue with your service does not impact Ready Five's availability and vice versa.
If most of your systems and services run in us-east-1 (N. Virginia), consider using us-west-2 (Oregon) for Ready Five. If your systems are primarily in eu-west-2 (London), consider using eu-west-1 (Ireland) for Ready Five.
Supported regions
You can install Ready Five Enterprise with all features enabled in the following regions:
- US East (N. Virginia) - us-east-1
- US West (Oregon) - us-west-2
- Europe (Ireland) - eu-west-1
The following regions are supported, but are missing inbound email receiving functionality, as the feature is not available in these regions. Outbound (sending) email is unaffected by this limitation.
- Asia Pacific (Mumbai) - ap-south-1
- Asia Pacific (Seoul) - ap-northeast-2
- Asia Pacific (Singapore) - ap-southeast-1
- Asia Pacific (Sydney) - ap-southeast-2
- Asia Pacific (Tokyo) - ap-northeast-1
- Canada (Central) - ca-central-1
- Europe (Frankfurt) - eu-central-1
- Europe (London) - eu-west-2
Other regions are unsupported because they are missing core services that are required for Ready Five to function. Although all regions have Lambda, DynamoDB, and S3, many are missing AppSync, Pinpoint, and/or SES. We'll update this list as these services are added to other regions and we've verified support for them.
Choose a domain or subdomain
Ready Five uses a few subdomains for sending and receiving data. You can either register a new domain for use with Ready Five or you can use a subdomain of a domain you already own.
For the purposes of this guide, we'll assume you own the mycompany.com domain name and you want to dedicate incidentmgmt.mycompany.com to this Ready Five Enterprise installation.
There are a few DNS entries that will need to be added to connect this subdomain to your Ready Five Enterprise installation, so make sure you have access to the DNS records for your domain and ensure that this domain or subdomain must not be in use by another else to ensure that existing services do not conflict.
Configure AWS Certificate Manager (ACM) to issue wildcard certificates for HTTPS services
Ready Five exposes HTTPS APIs for accessing the GraphQL API and for receiving events from integrations. TLSv1.2+ is required on all of these APIs, and a valid certificate must be in place to serve these requests.
Here you'll request and validate 2 certificates for the same domain. We need one in US (N. Virginia) and one in the region you selected for the Ready Five installation.
Why 2 certificates? Ready Five uses regional API Gateway endpoints for all integration and API endpoints, which requires an ACM certificate in that region. Additionally, Ready Five serves the web application using CloudFront, which serves from edges around the globe but requires a certificate originating from us-east-1.
If you're deploying Ready Five to us-east-1, you only need to request and validate a single certificate in us-east-1.
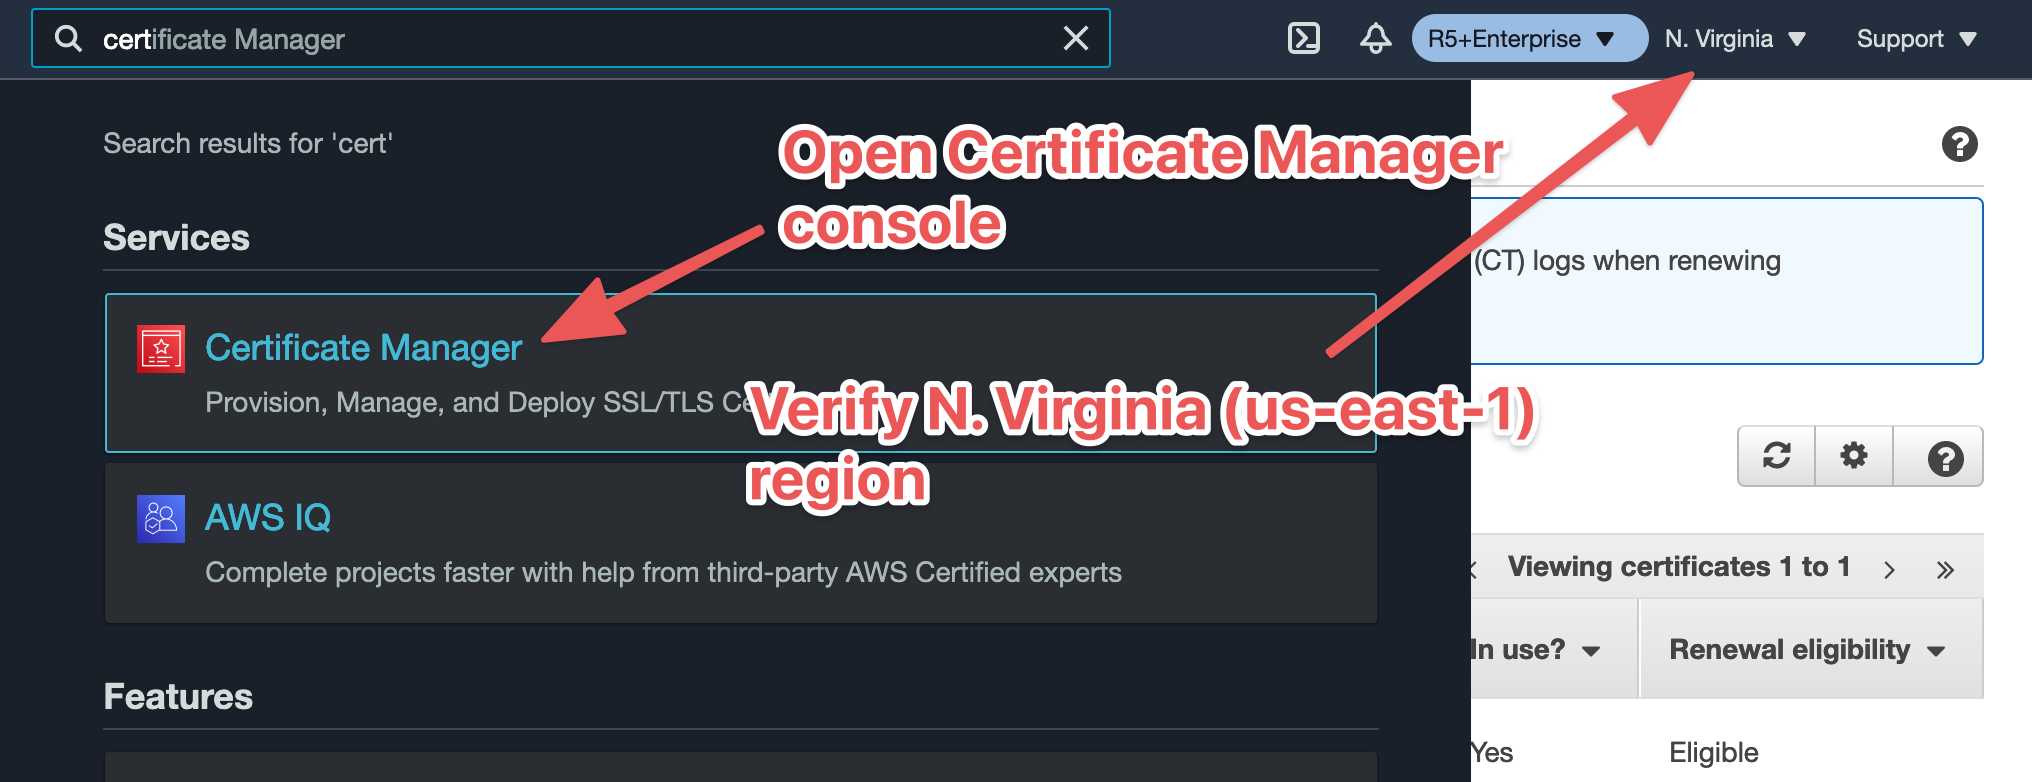
Login to your account via the AWS Management Console and choose the desired region for the Ready Five Enterprise installation. Then open the AWS Certificate Manager (ACM) console.
Request and validate a new certificate
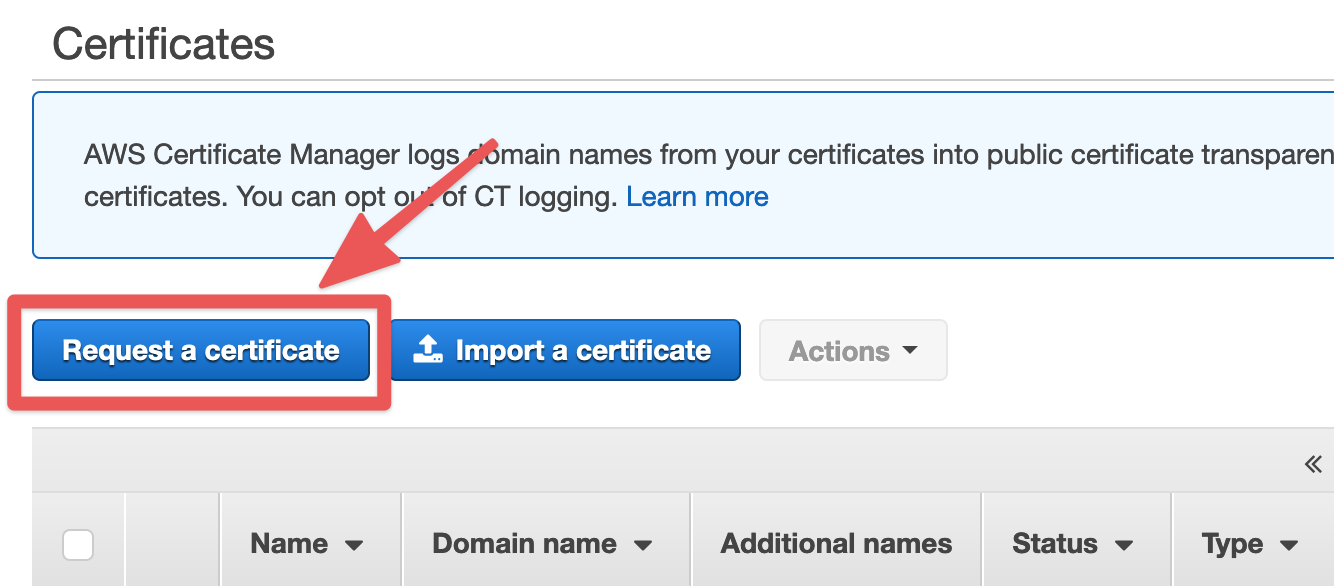
Click the "Request a certificate" button in the console.
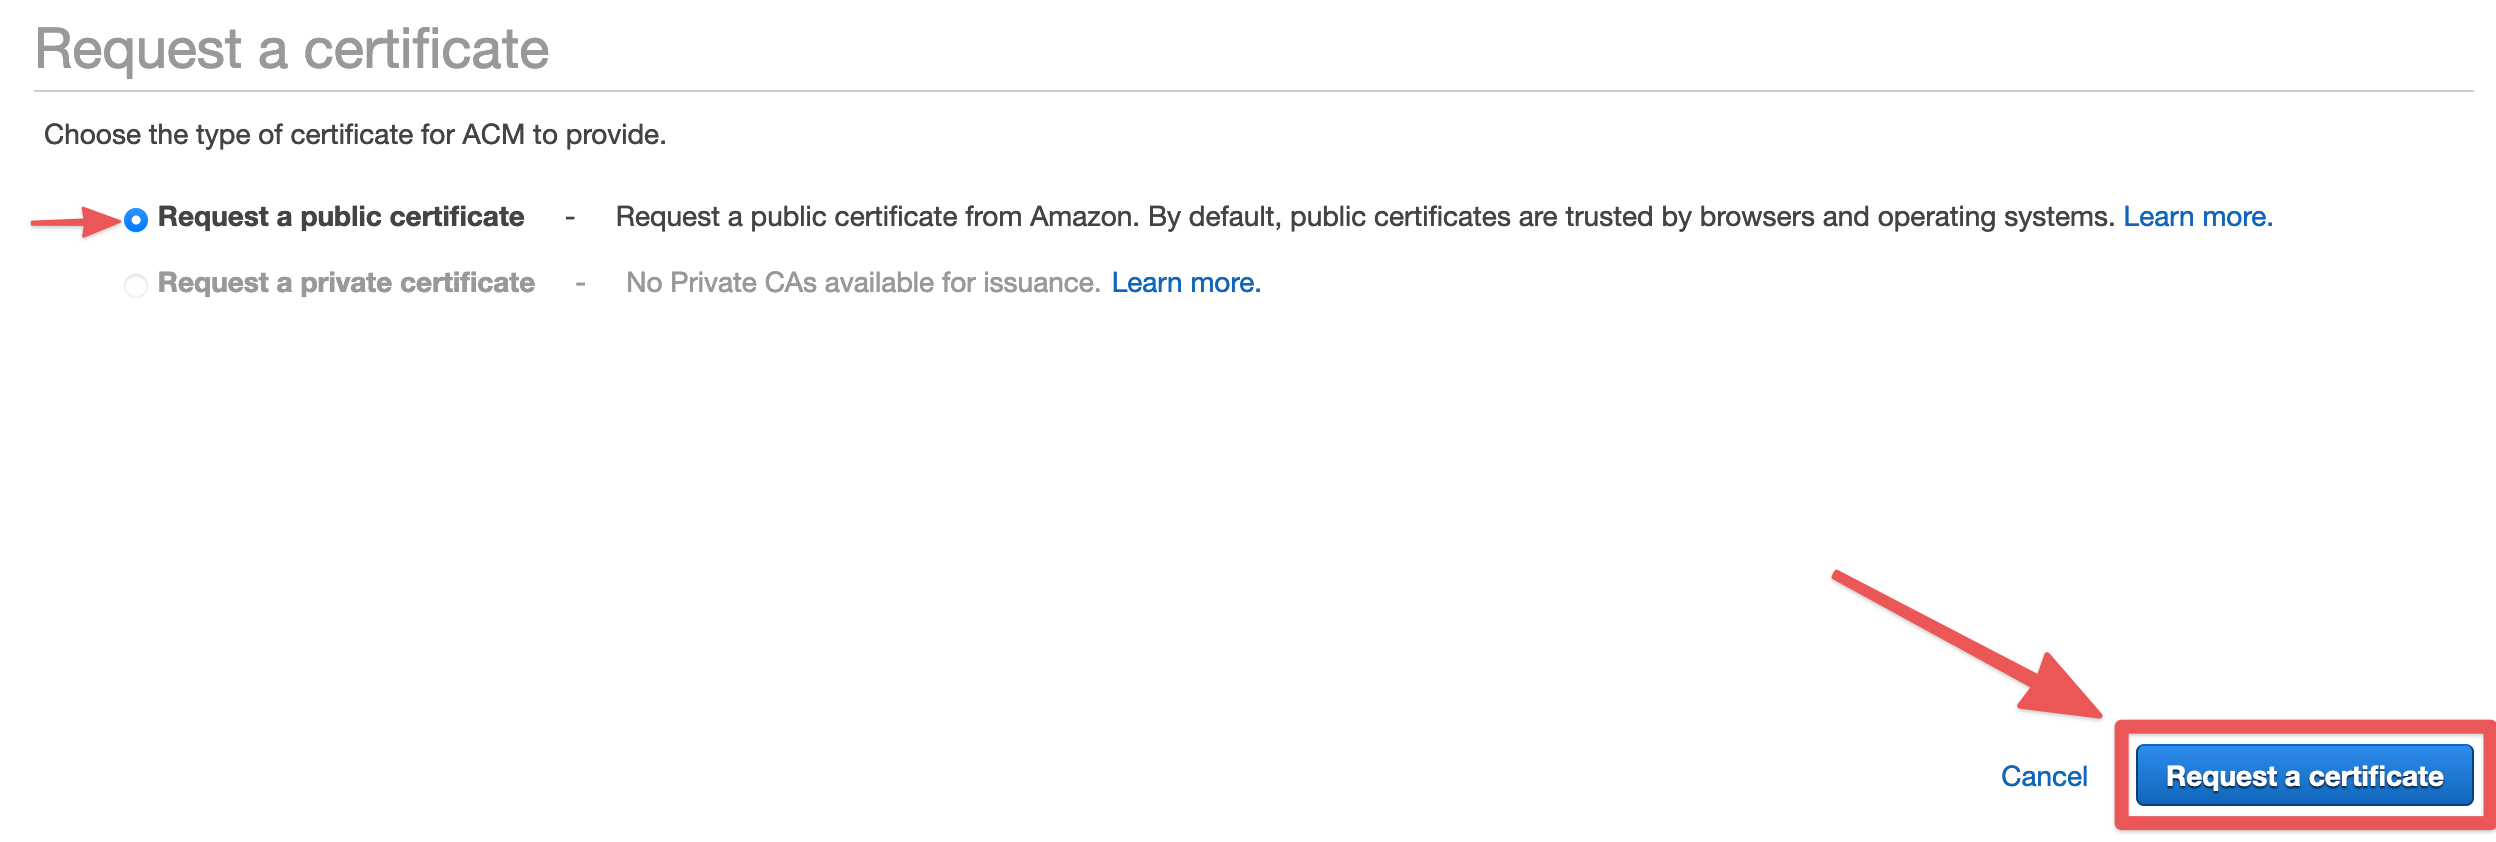
You'll want to request a public certificate from Amazon.
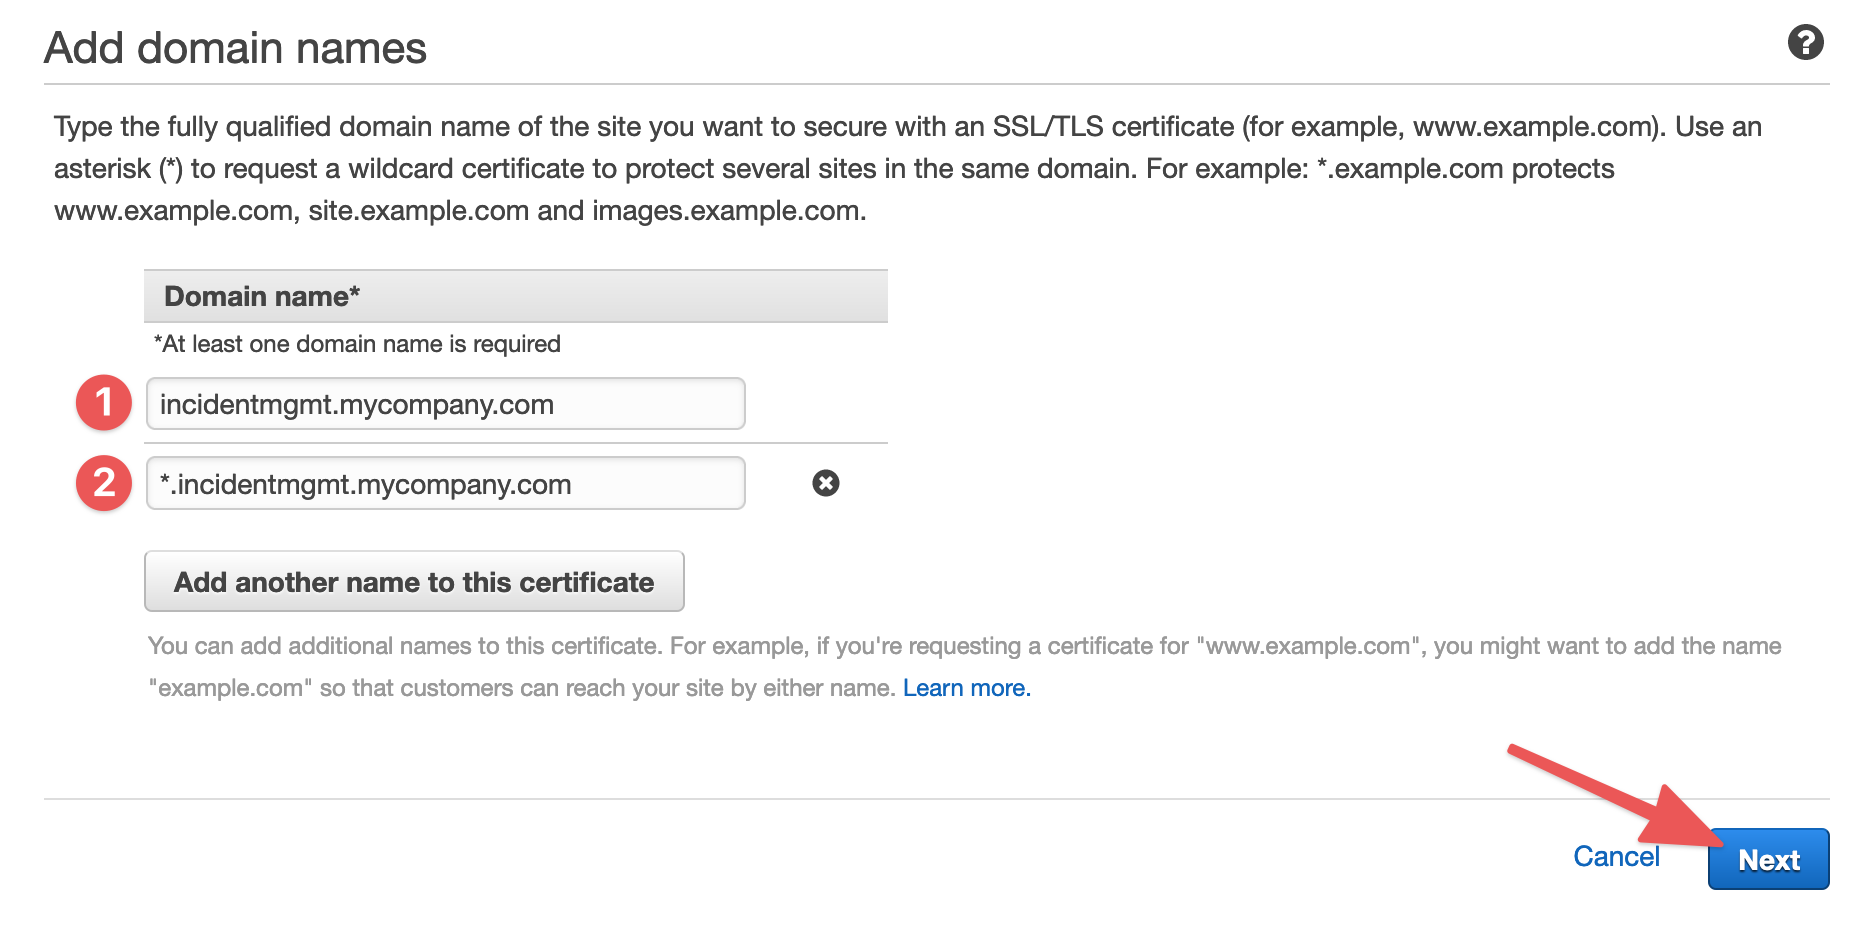
In the previous step, we decided to use incidentmgmt.mycompany.com as our domain for the Ready Five Enterprise installation. For this certificate, we need to validate the root of that domain and a wildcard of its subdomains. In the "Domain name" field, we would enter incidentmgmt.mycompany.com. Click "Add another name to this certificate" and enter *.incidentmgmt.mycompany.com (using the domain or subdomain you selected with the "*." prefix). Click "Next".
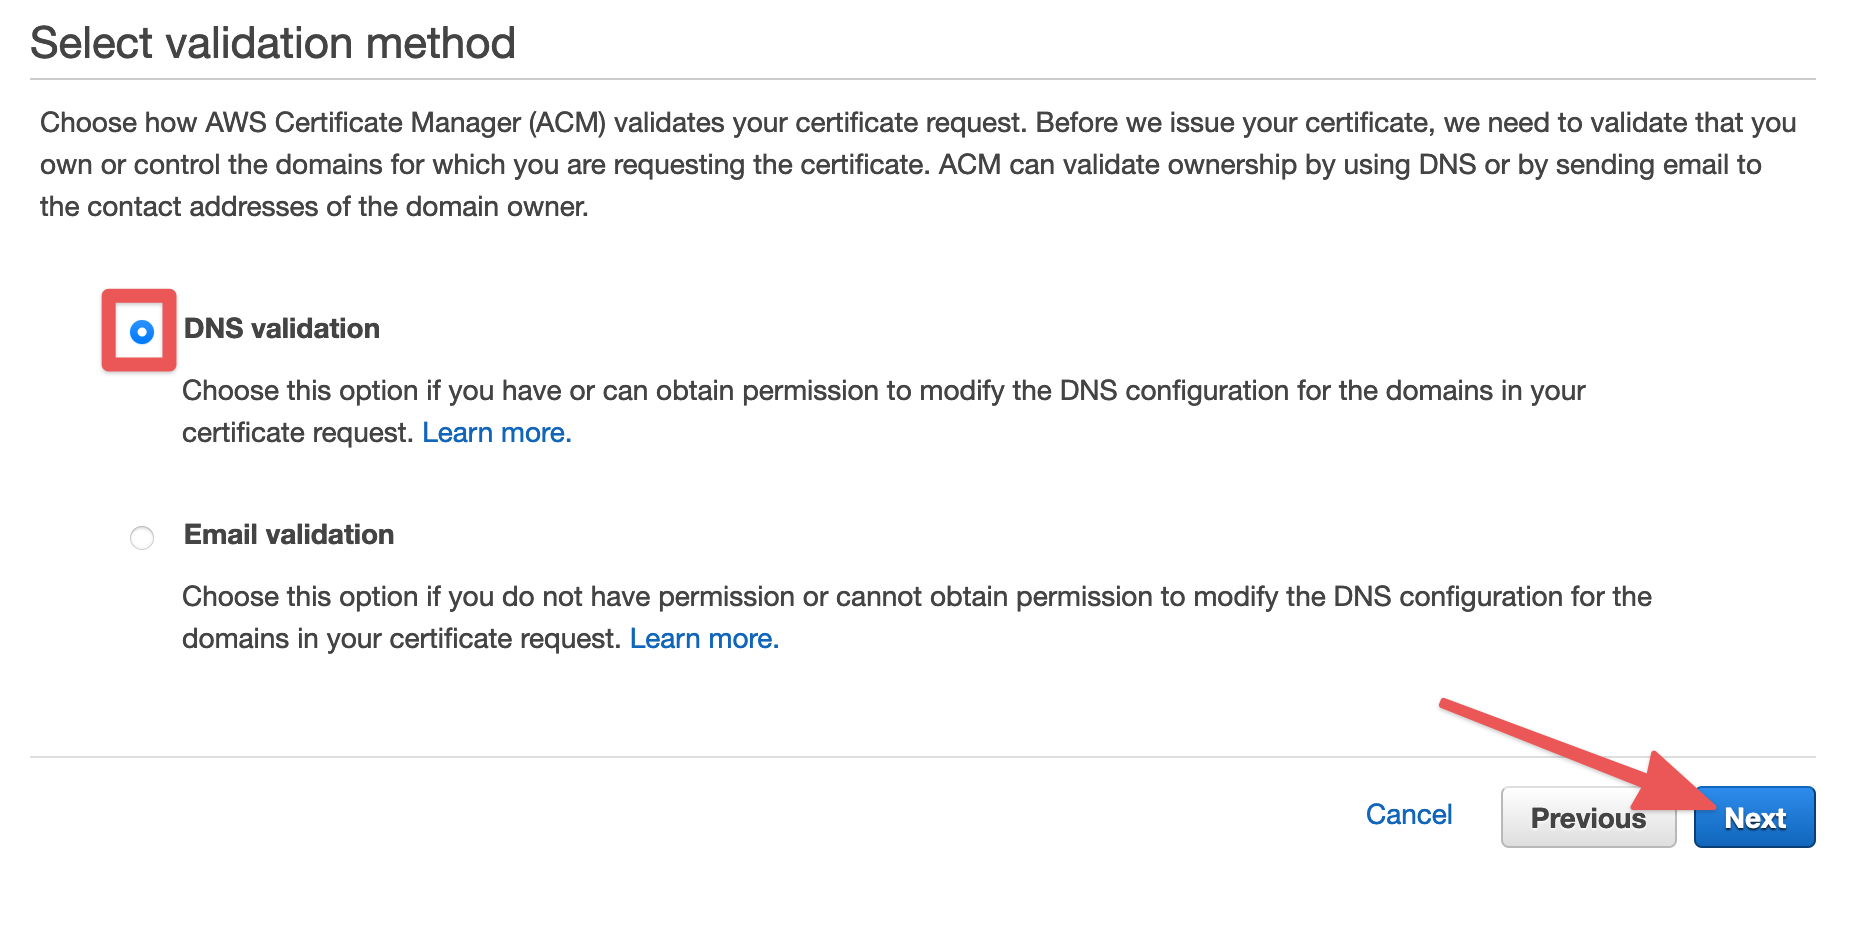
Choose "DNS validation" as your validation method. Using DNS and leaving the validation record in place ensures that the certificate can auto-renew each year without any action on your part. Using email as the validation method will work, but we recommend against it as it can cause service outages if the certificate expires.
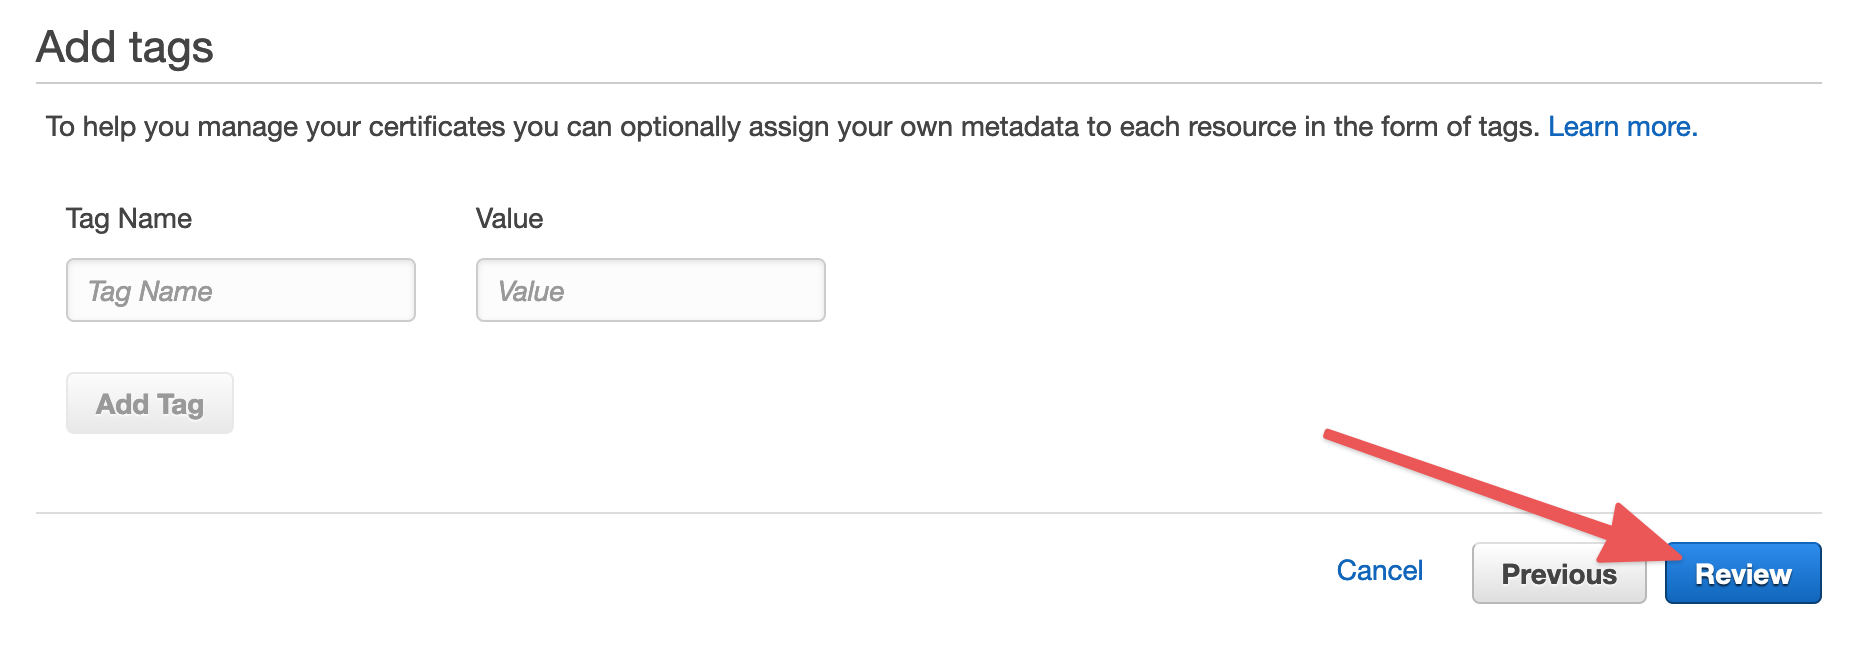
You can optionally add any tags that you want to apply to this ACM certificate. Then click "Review".
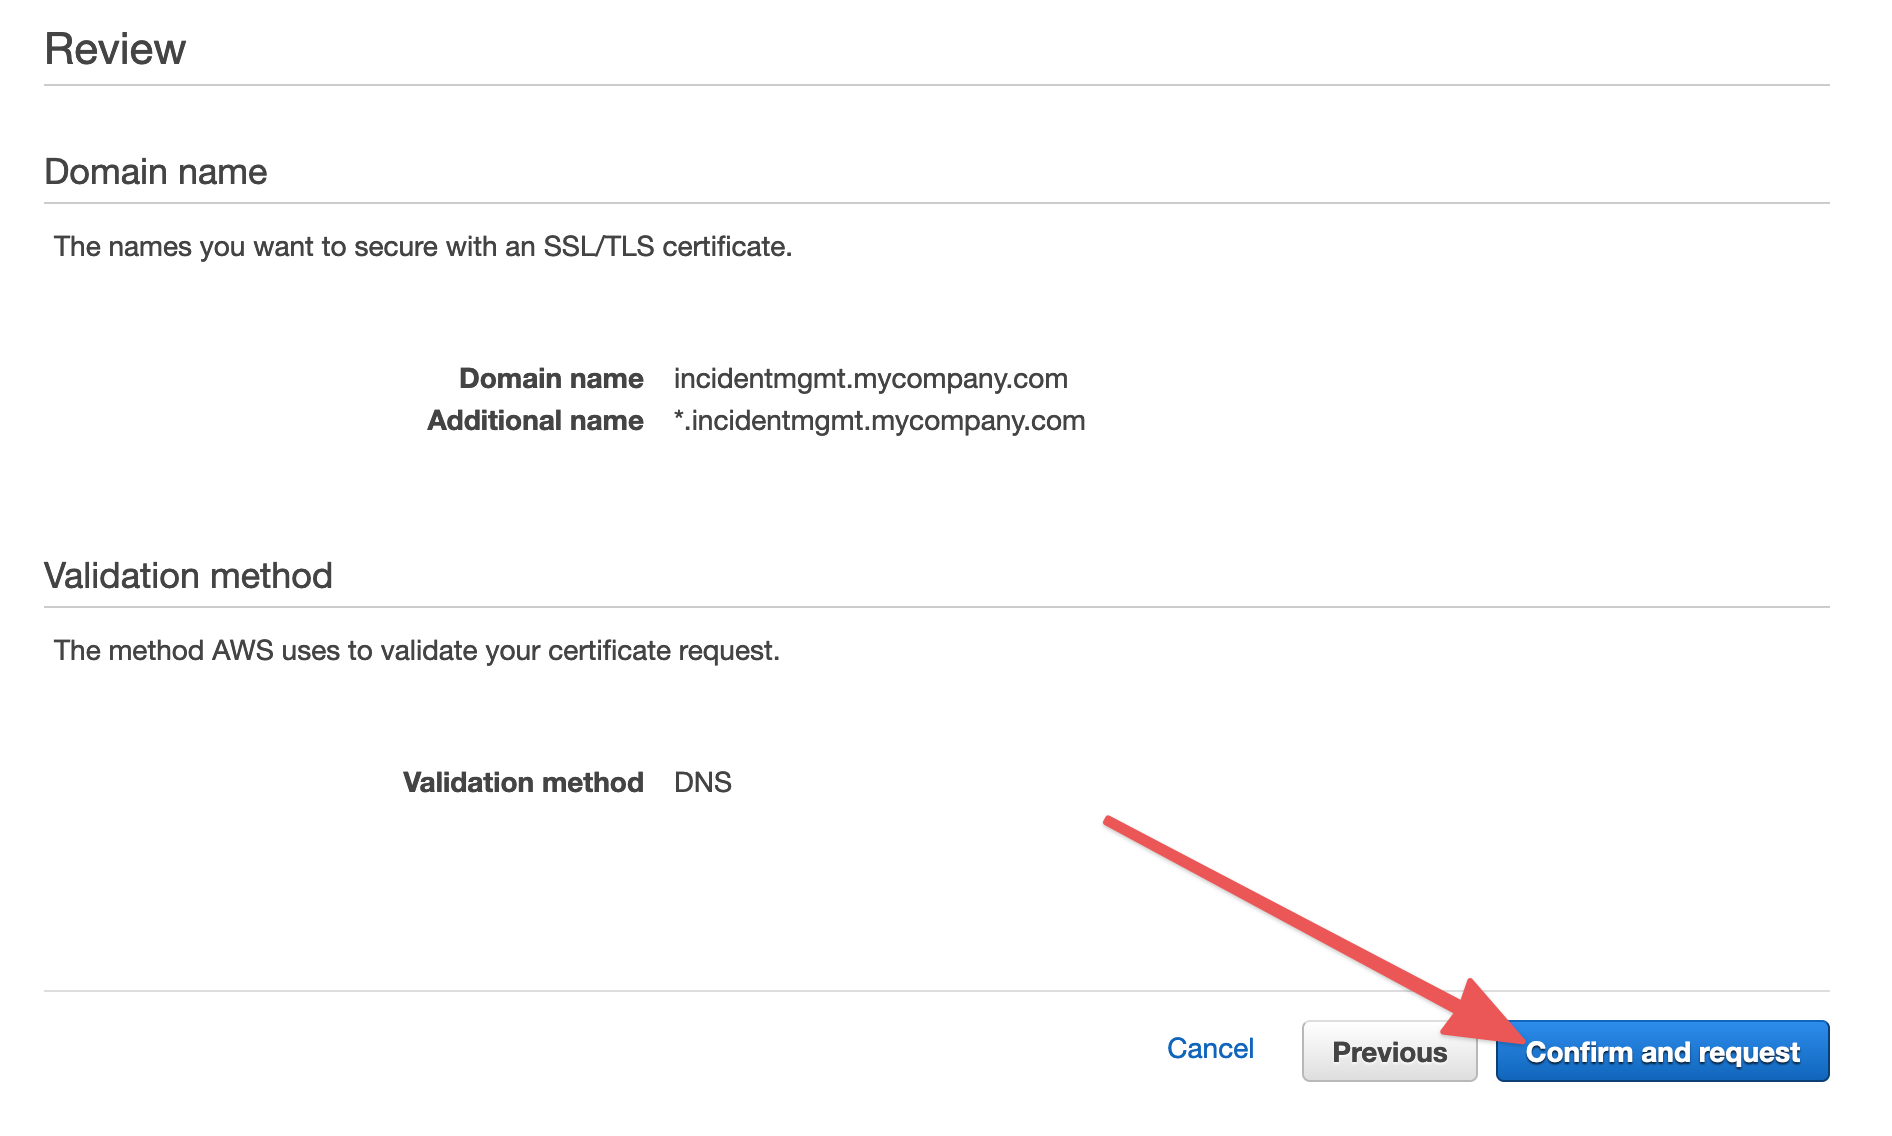
Verify the domain name you entered is correct and click "Confirm and request".
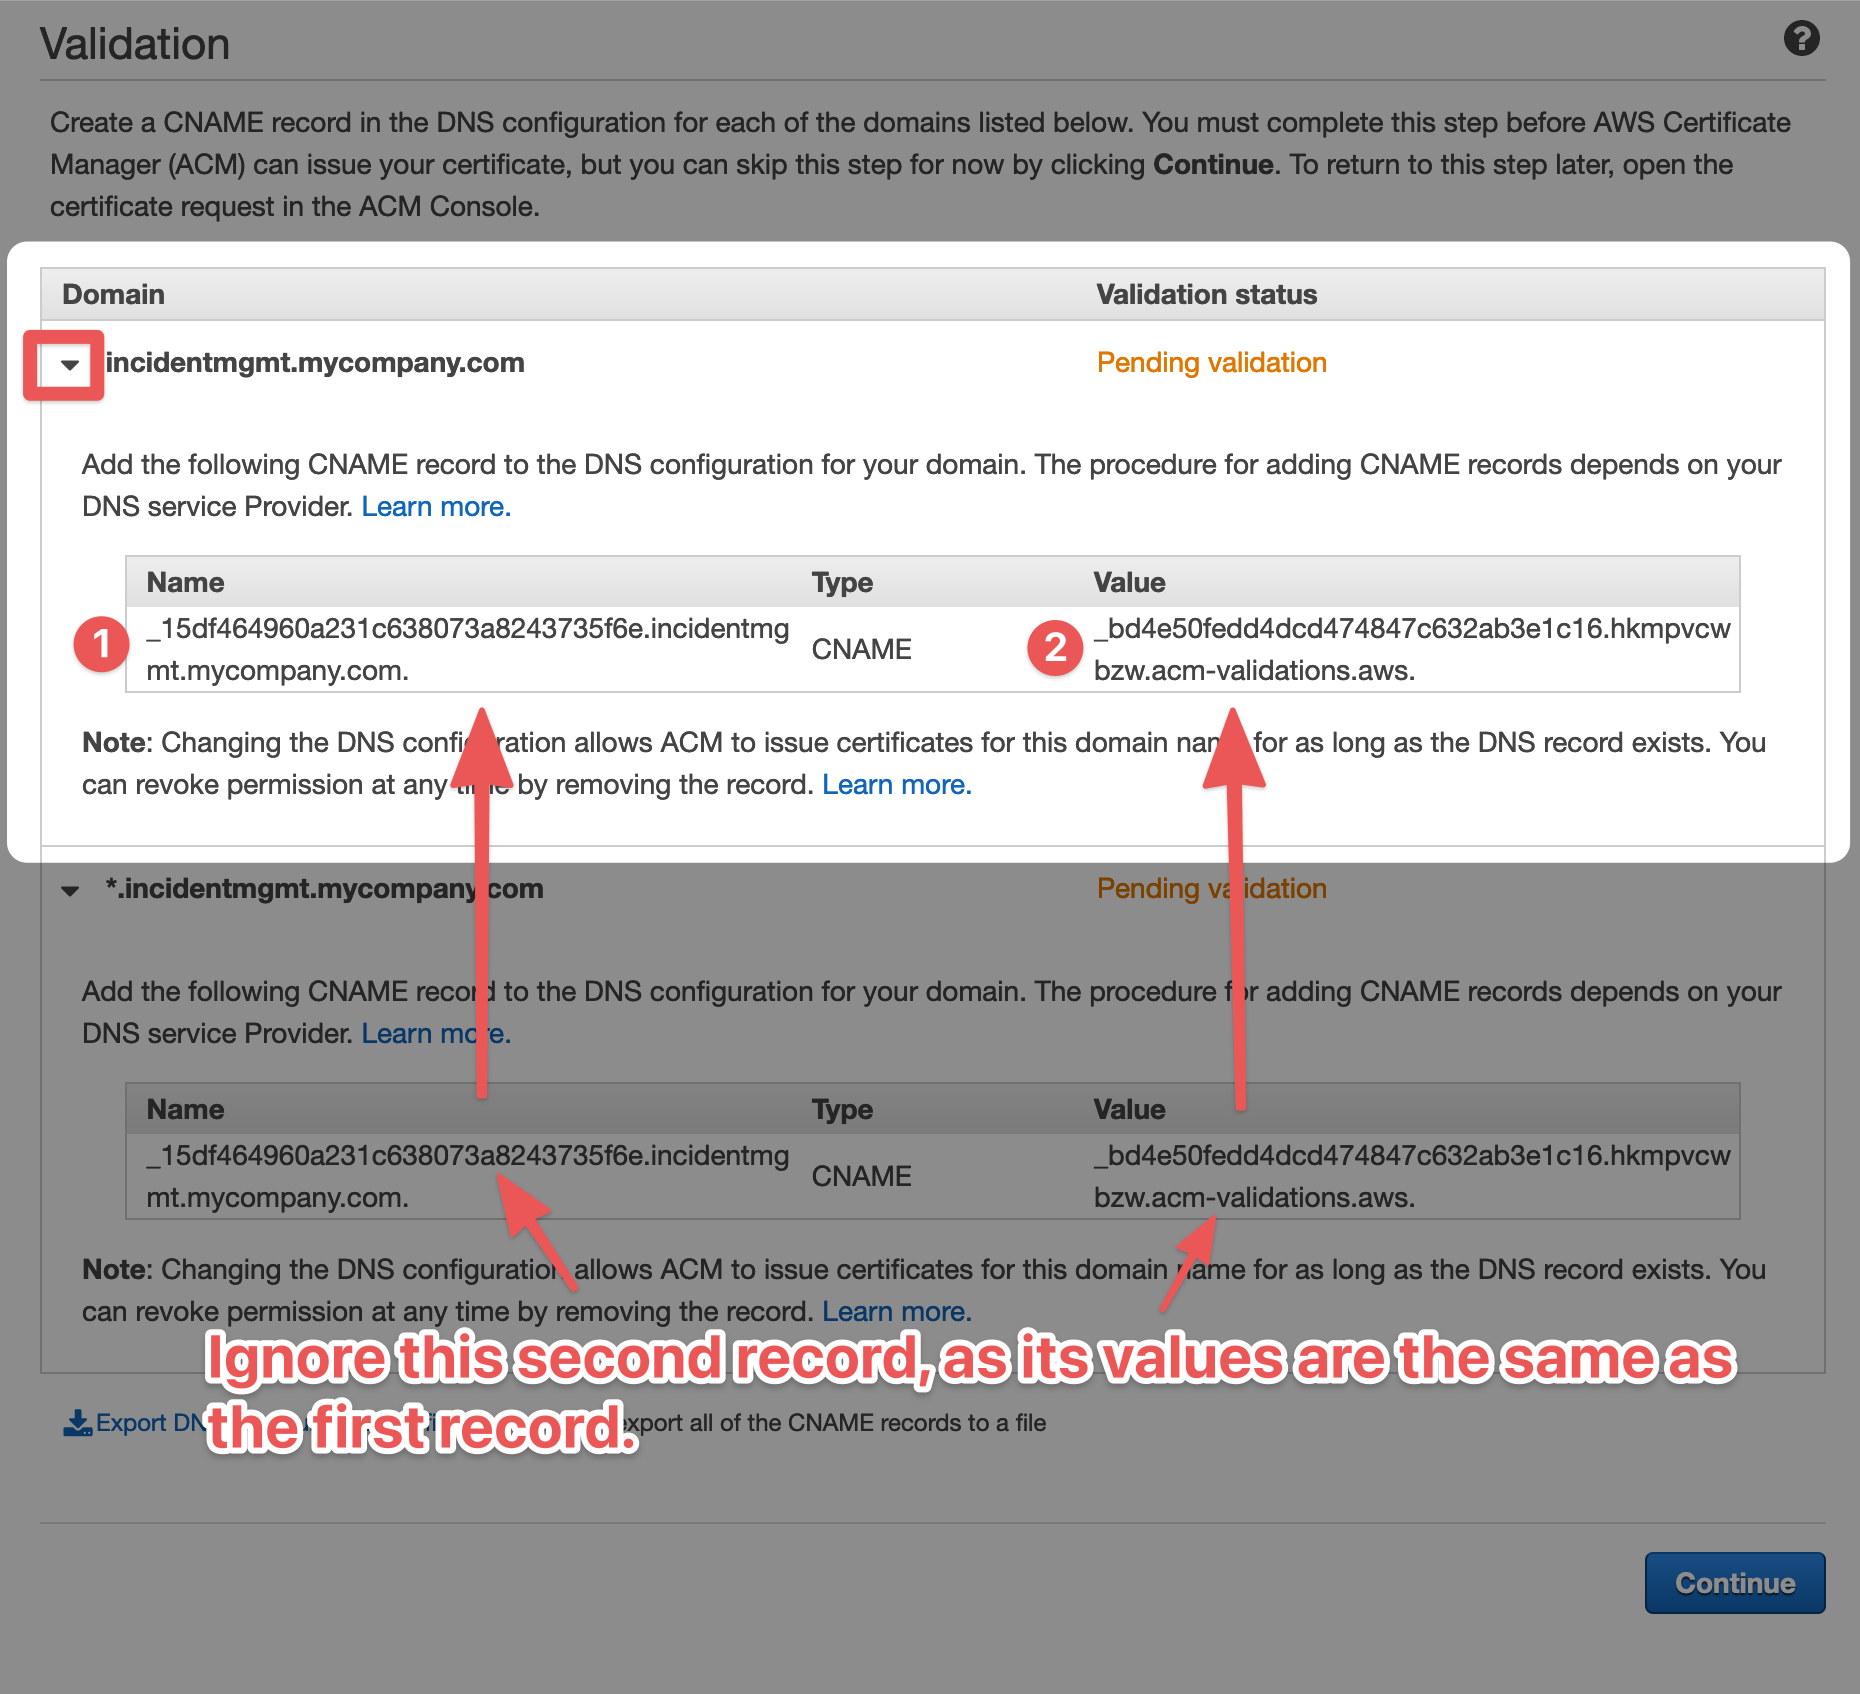
In order for the certificate to be usable, you need to prove ownership of the domain by adding a CNAME record to DNS.
ACM generates a CNAME name and value that must be added to your DNS configuration. You may notice that the CNAME names and values for the root domain and the wildcard domain are the same. This is by design, and you only need to add the record once and both will validate.
After adding this CNAME to your DNS configuration, ACM typically validates the certificate within a few minutes.
Additional documentation for validating domain ownership with DNS can be found here.
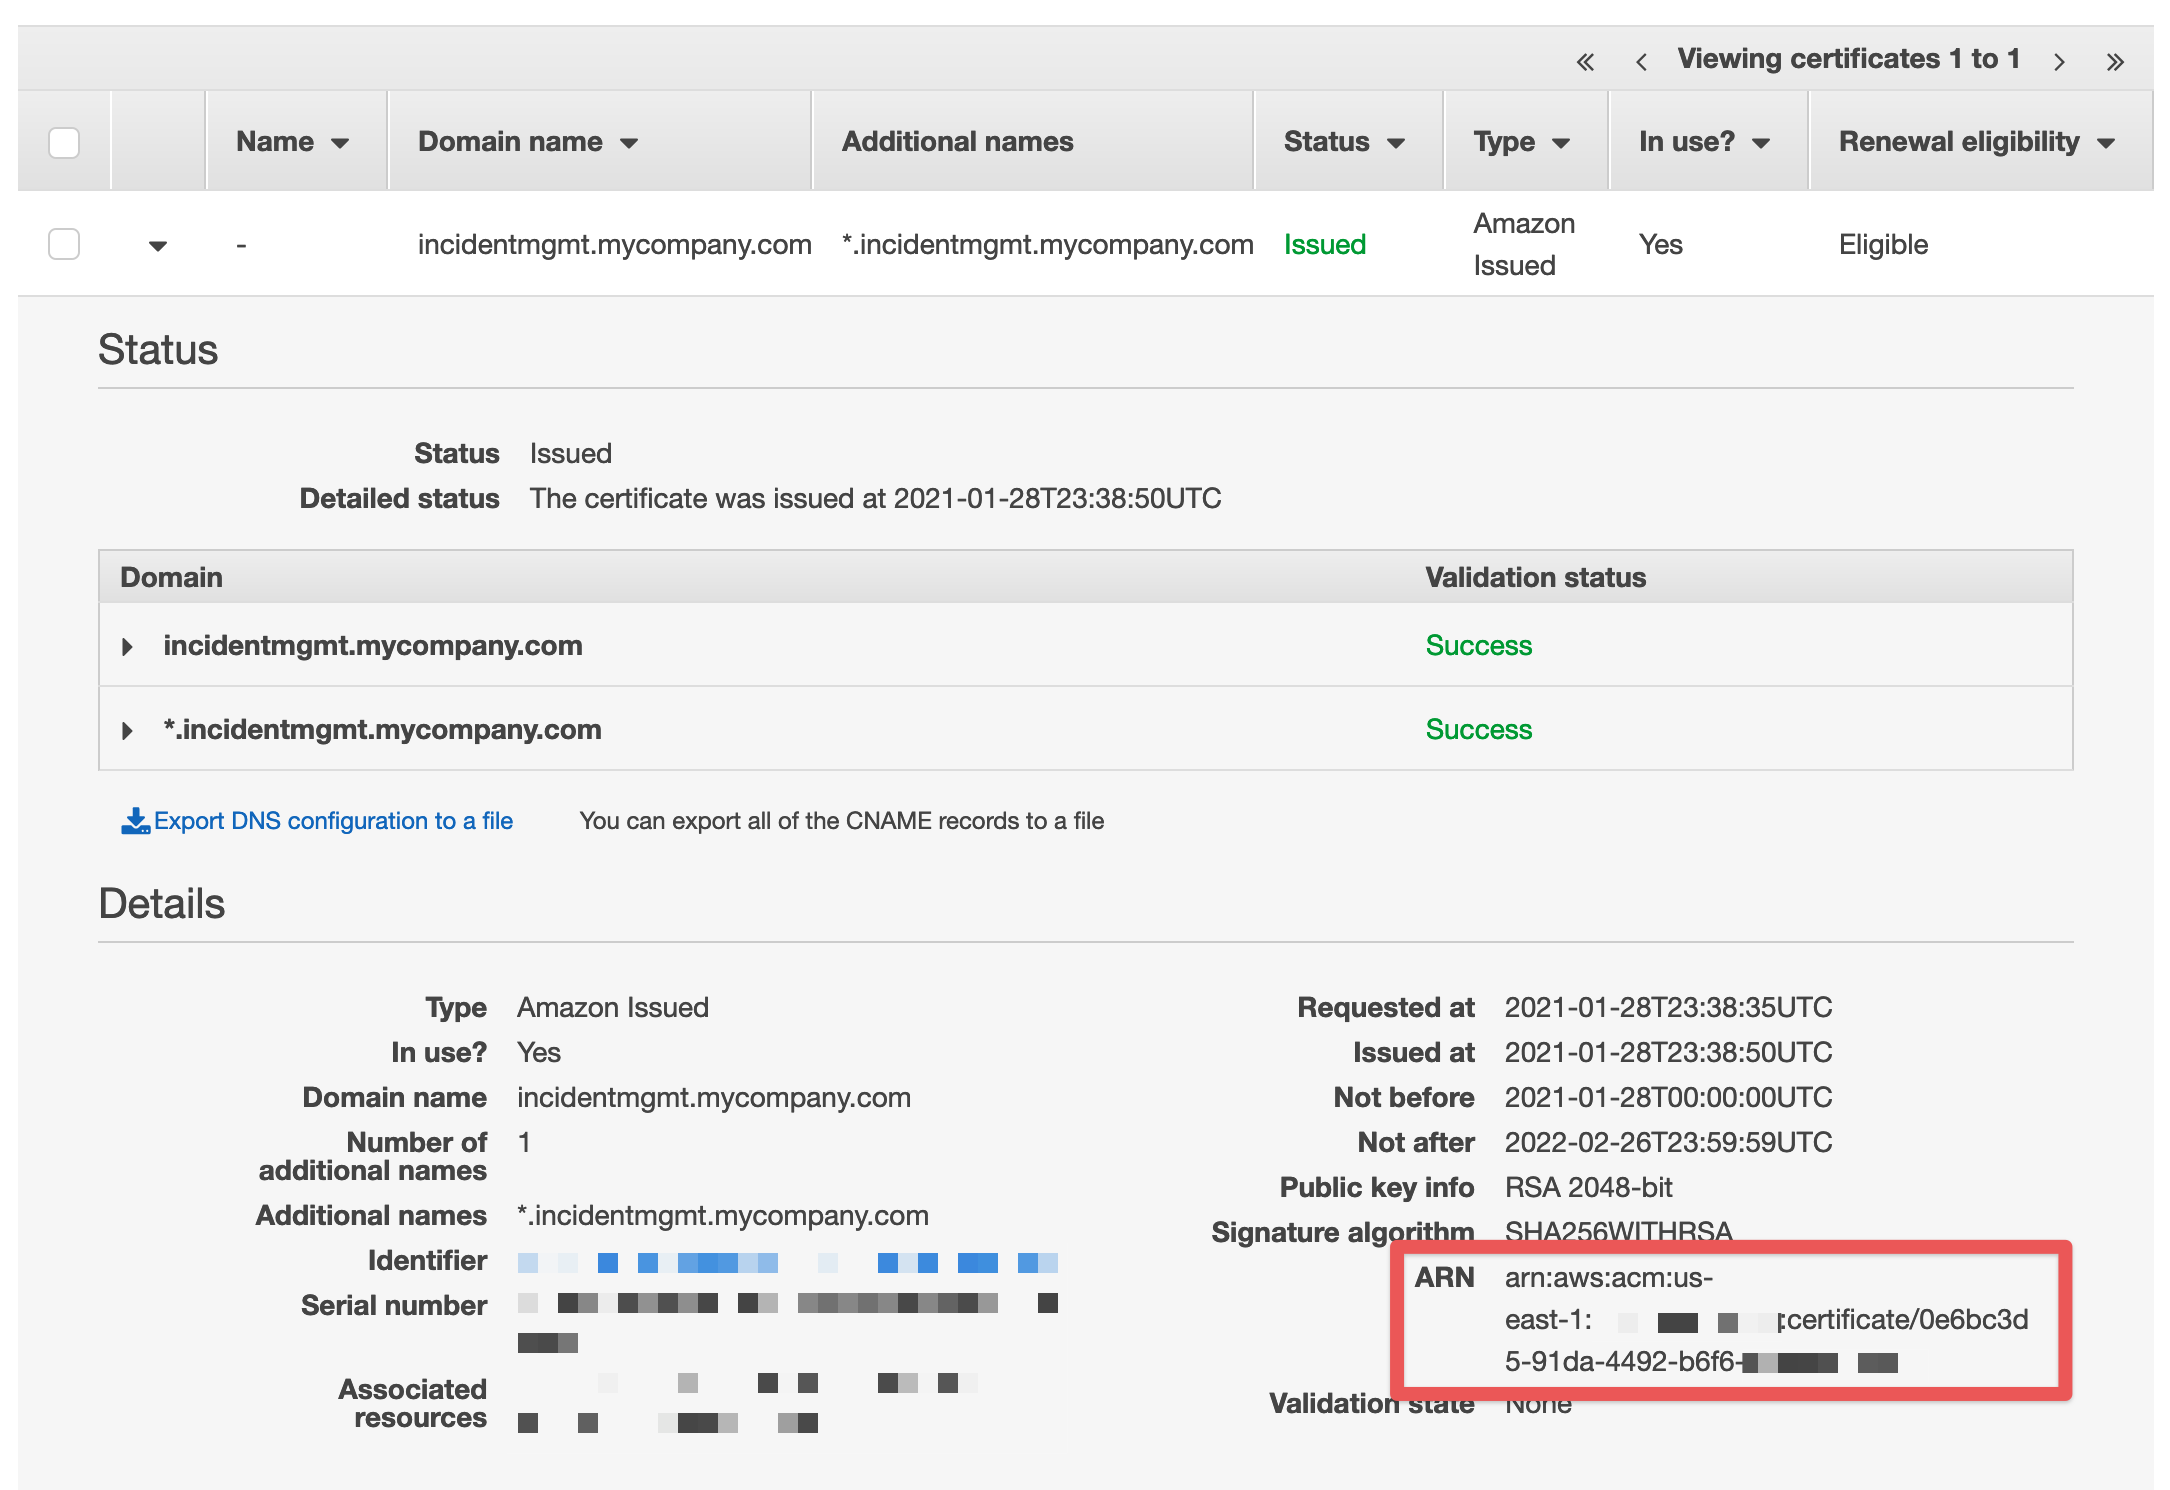
Once the status changes to "Issued", expand the certificate details and make a note of the ARN - we'll need it later. Then continue to the next step.
Request and validate a new certificate in the target Ready Five installation region
Now that you have requested and validated a certificate in us-east-1, you need to generate another certificate with the same settings in the desired Ready Five installation region.
Switch regions in the AWS console to the desired Ready Five installation region. In our example case here we're installing to US West (Oregon) - us-west-2.
If your target region is us-east-1, you can skip this step and use the same certificate for both the regional and global certificates.
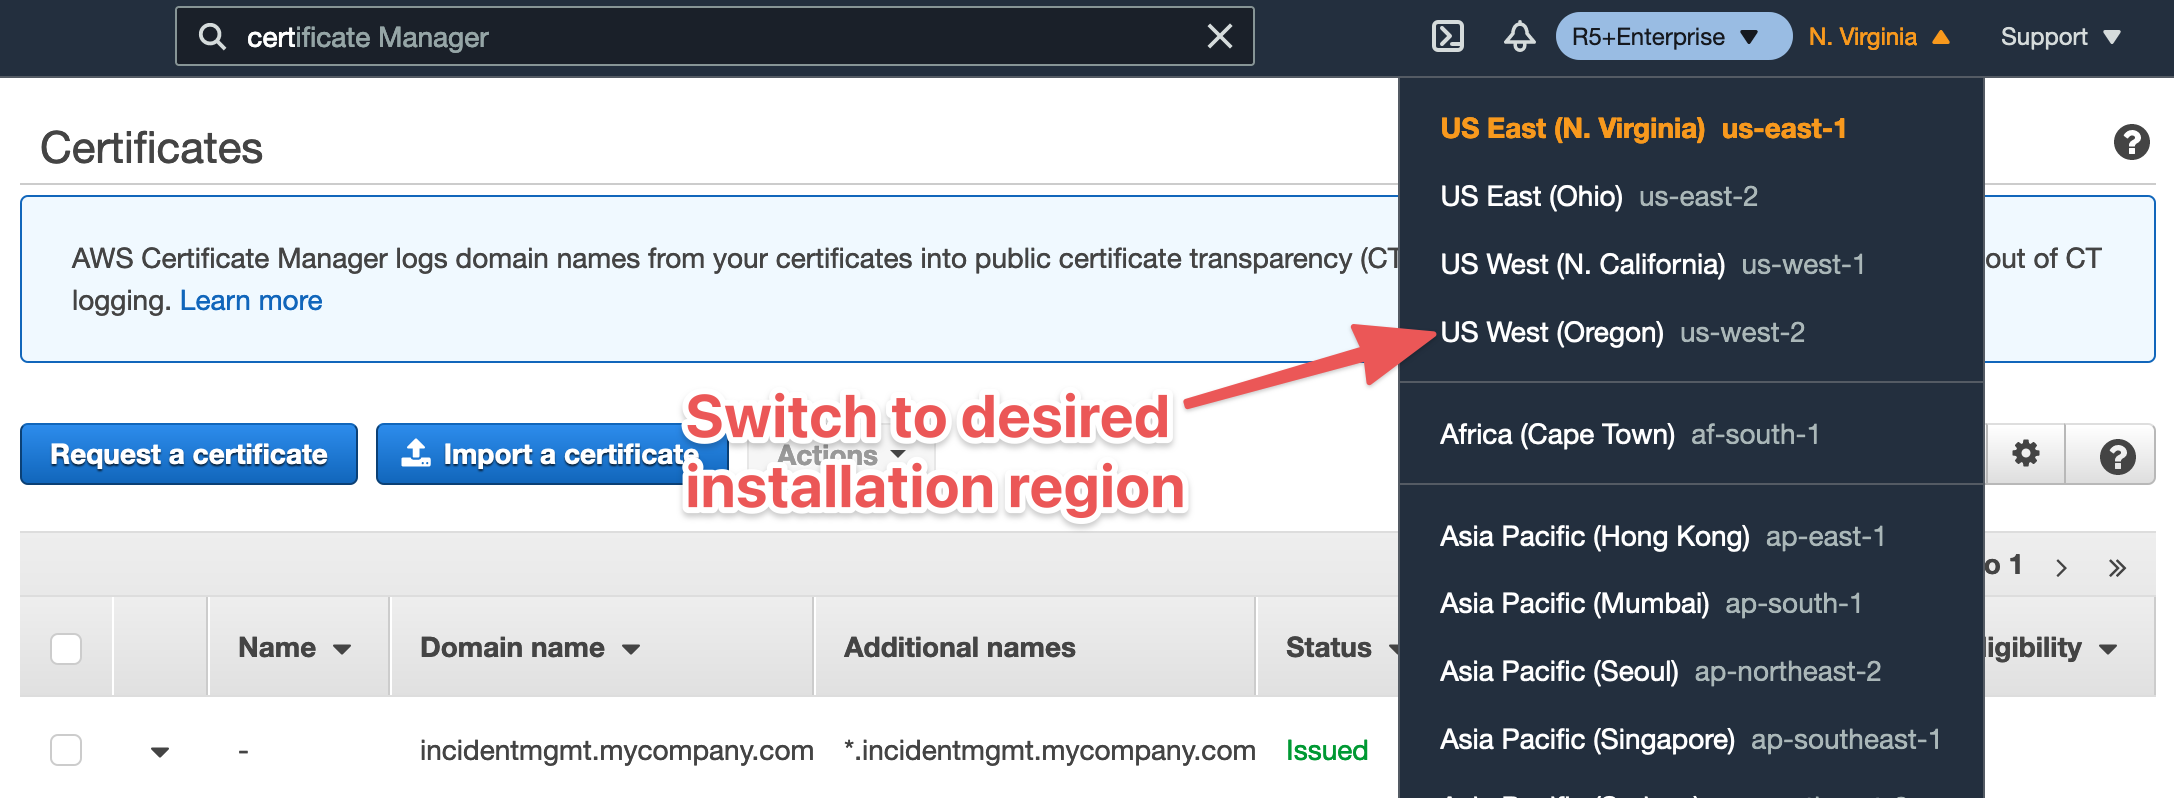
Now, follow the Request and validate a new certificate instructions following the exact same steps as you did previously using the same domain names.
Since the domain was already validated with DNS when requesting the certificate for us-east-1, you will not need to modify your DNS configuration to validate this additional copy of the certificate. It will automatically verify, typically within a few seconds of the request.
Once the status changes to "Issued" for this certificate, expand the details and make a note of this ARN as well (it's different than the us-east-1 one).
Configure Amazon Simple Email Service (SES) for outgoing email
Ready Five sends emails for various things such as incident notifications and password resets. In order for the upcoming CloudFormation setup process to succeed, SES must first have its sending domain verified and must be out of "sandbox" mode.
Login to your account via the AWS Management Console and choose the desired region for the Ready Five Enterprise installation. Then open the Simple Email Service (SES) console.

Verify a domain for sending and receiving
Each email that is sent or received by your Ready Five Enterprise installation must be sent from a verified domain and must be digitally signed by SES.
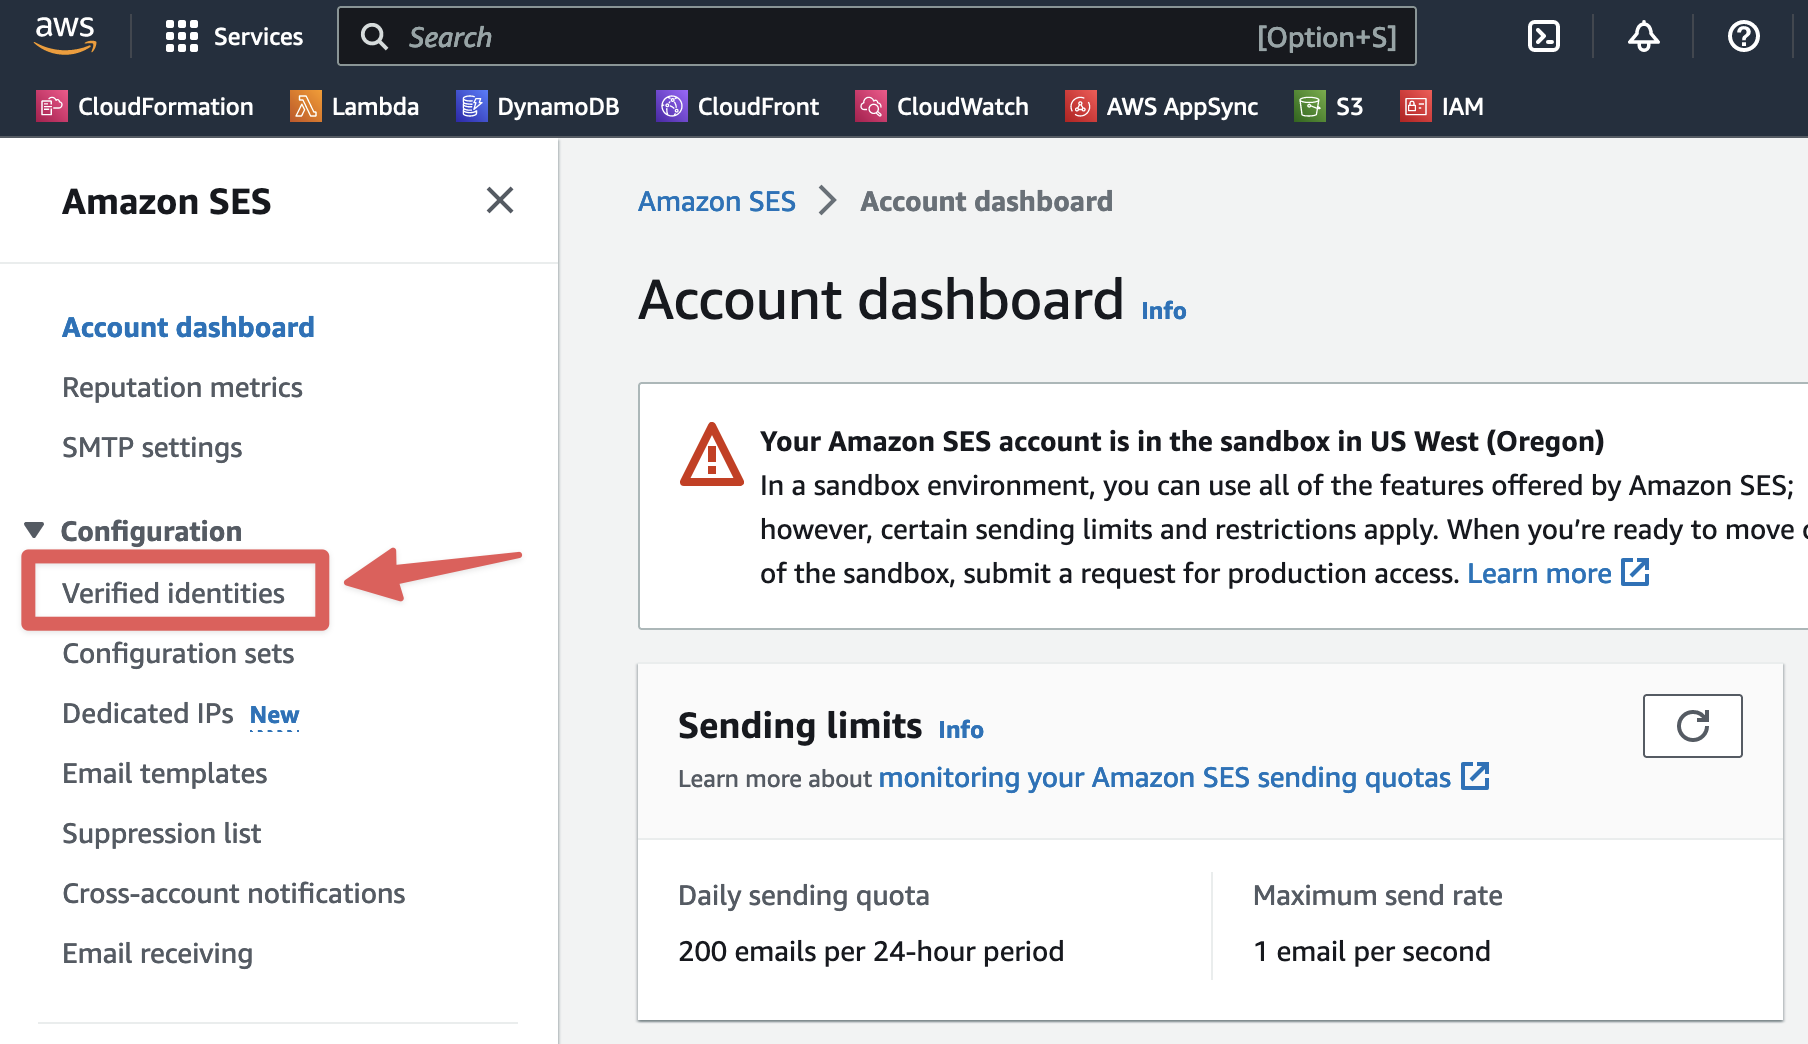
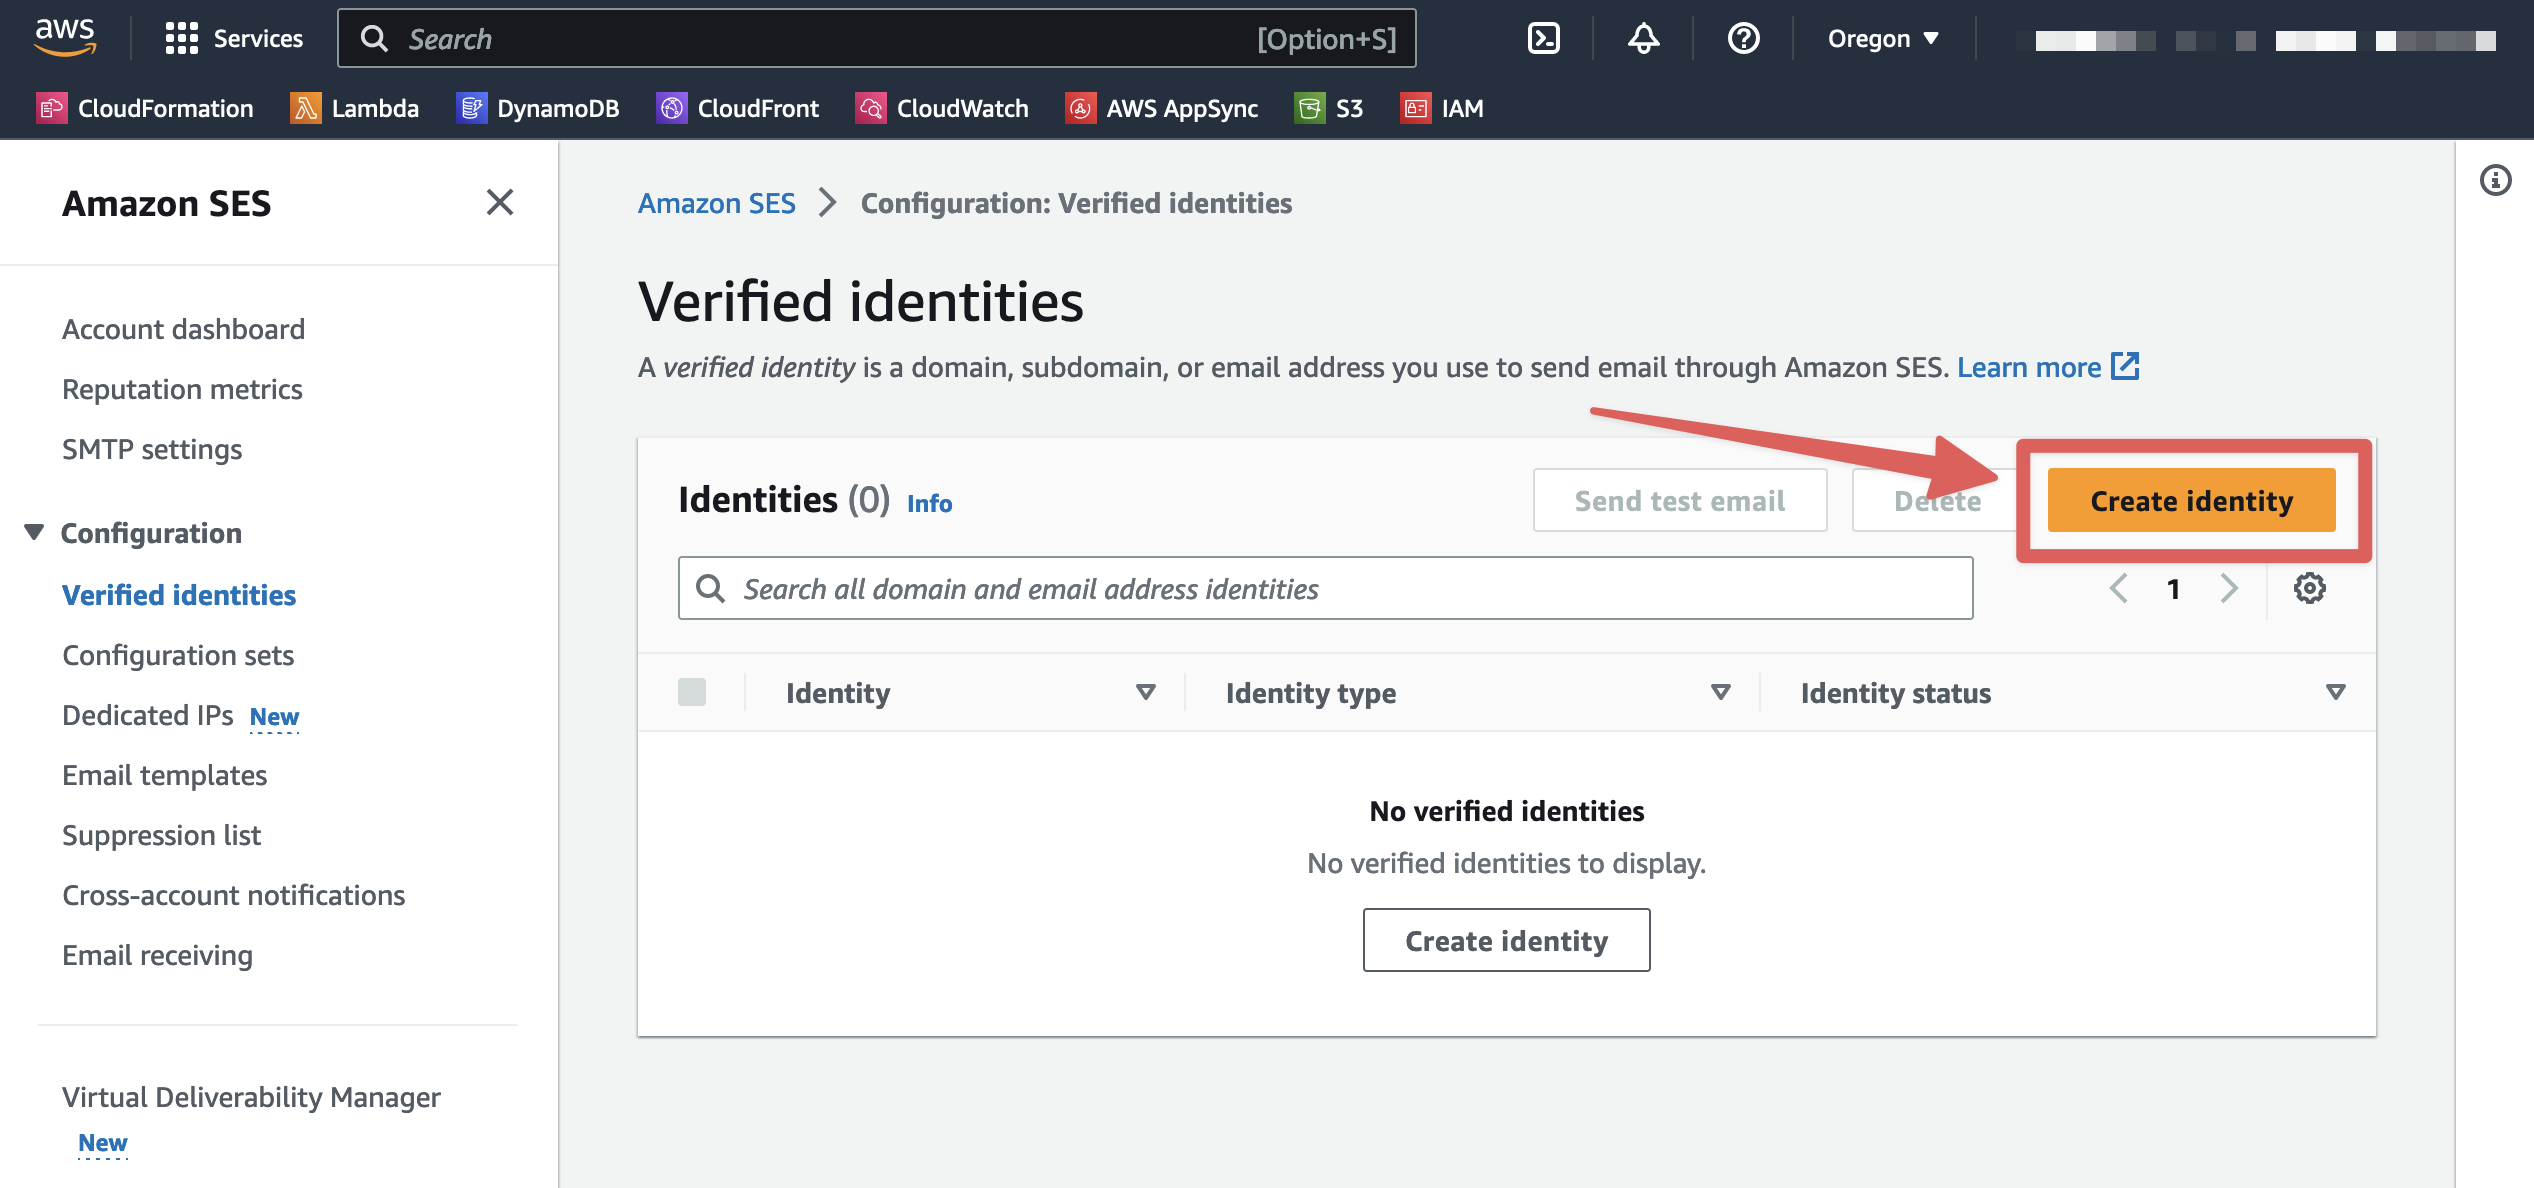
Open the "Verified identities" navigation item in the "Configuration" section of the SES navigation.
Click "Create identity".
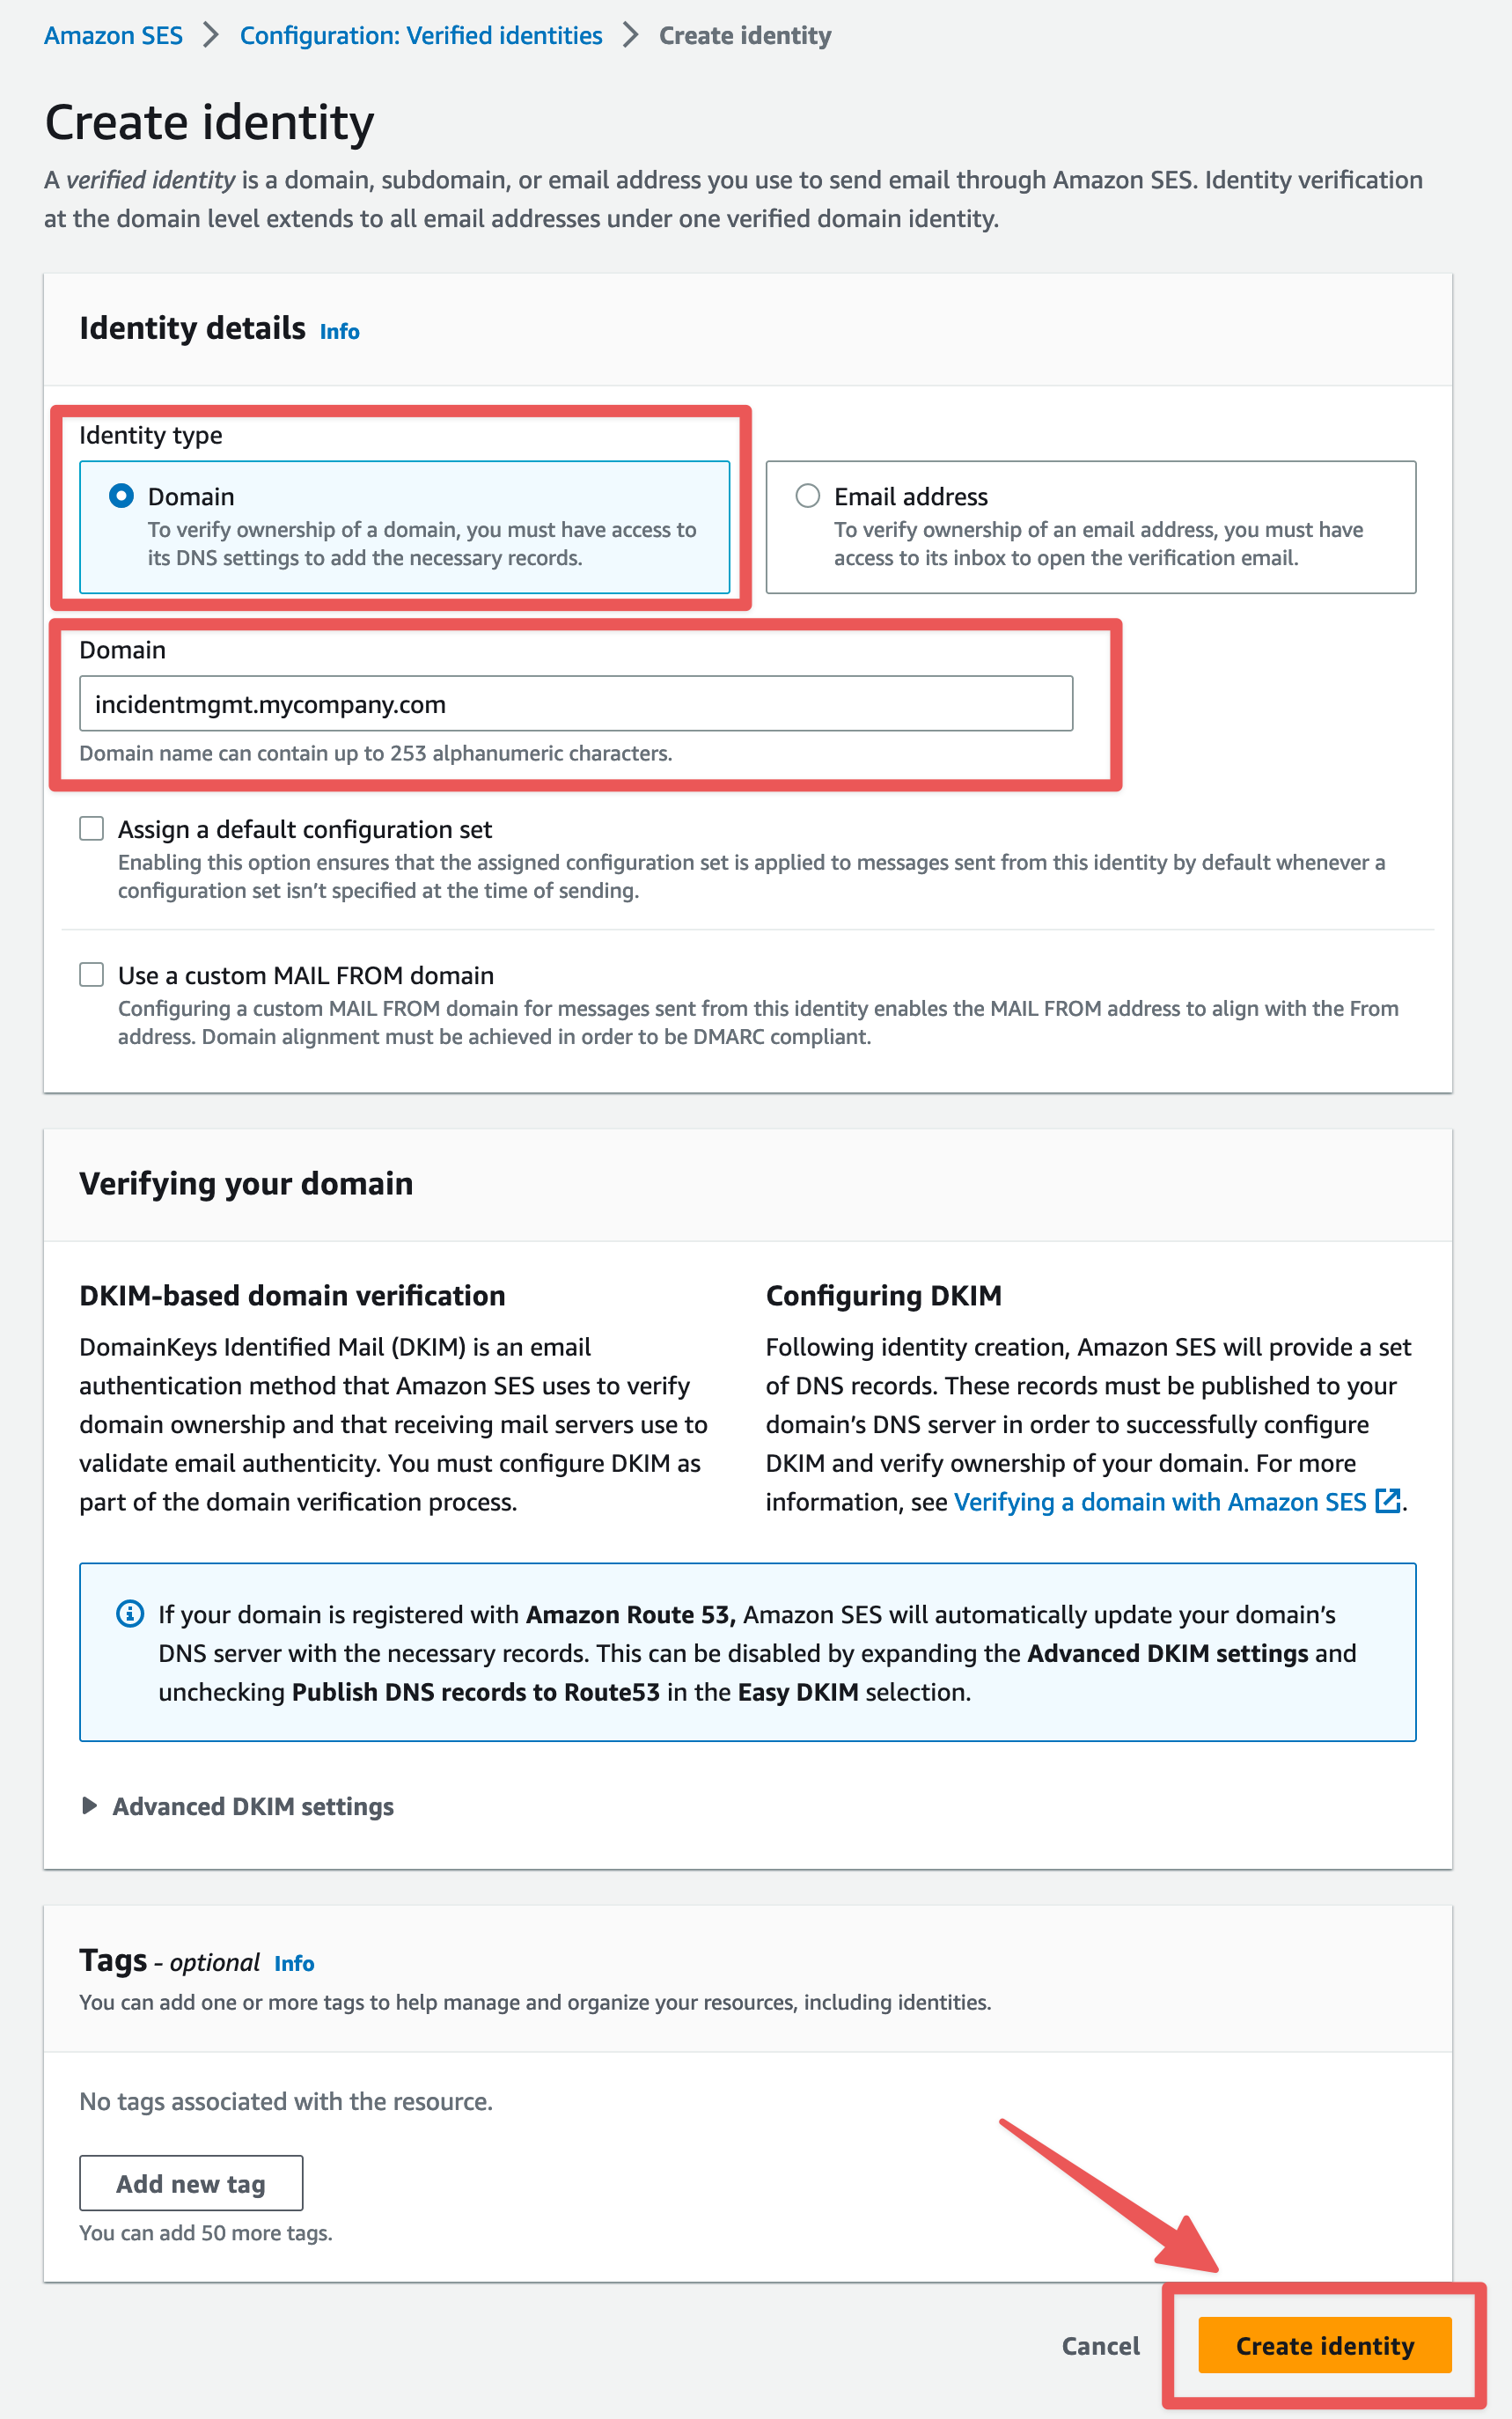
Choose "Domain" for the Identity type. Enter the domain or subdomain dedicated to this Ready Five Enterprise installation. We're going to use incidentmgmt.mycompany.com as an example. Leave other settings as the default and click the "Create identity" button.
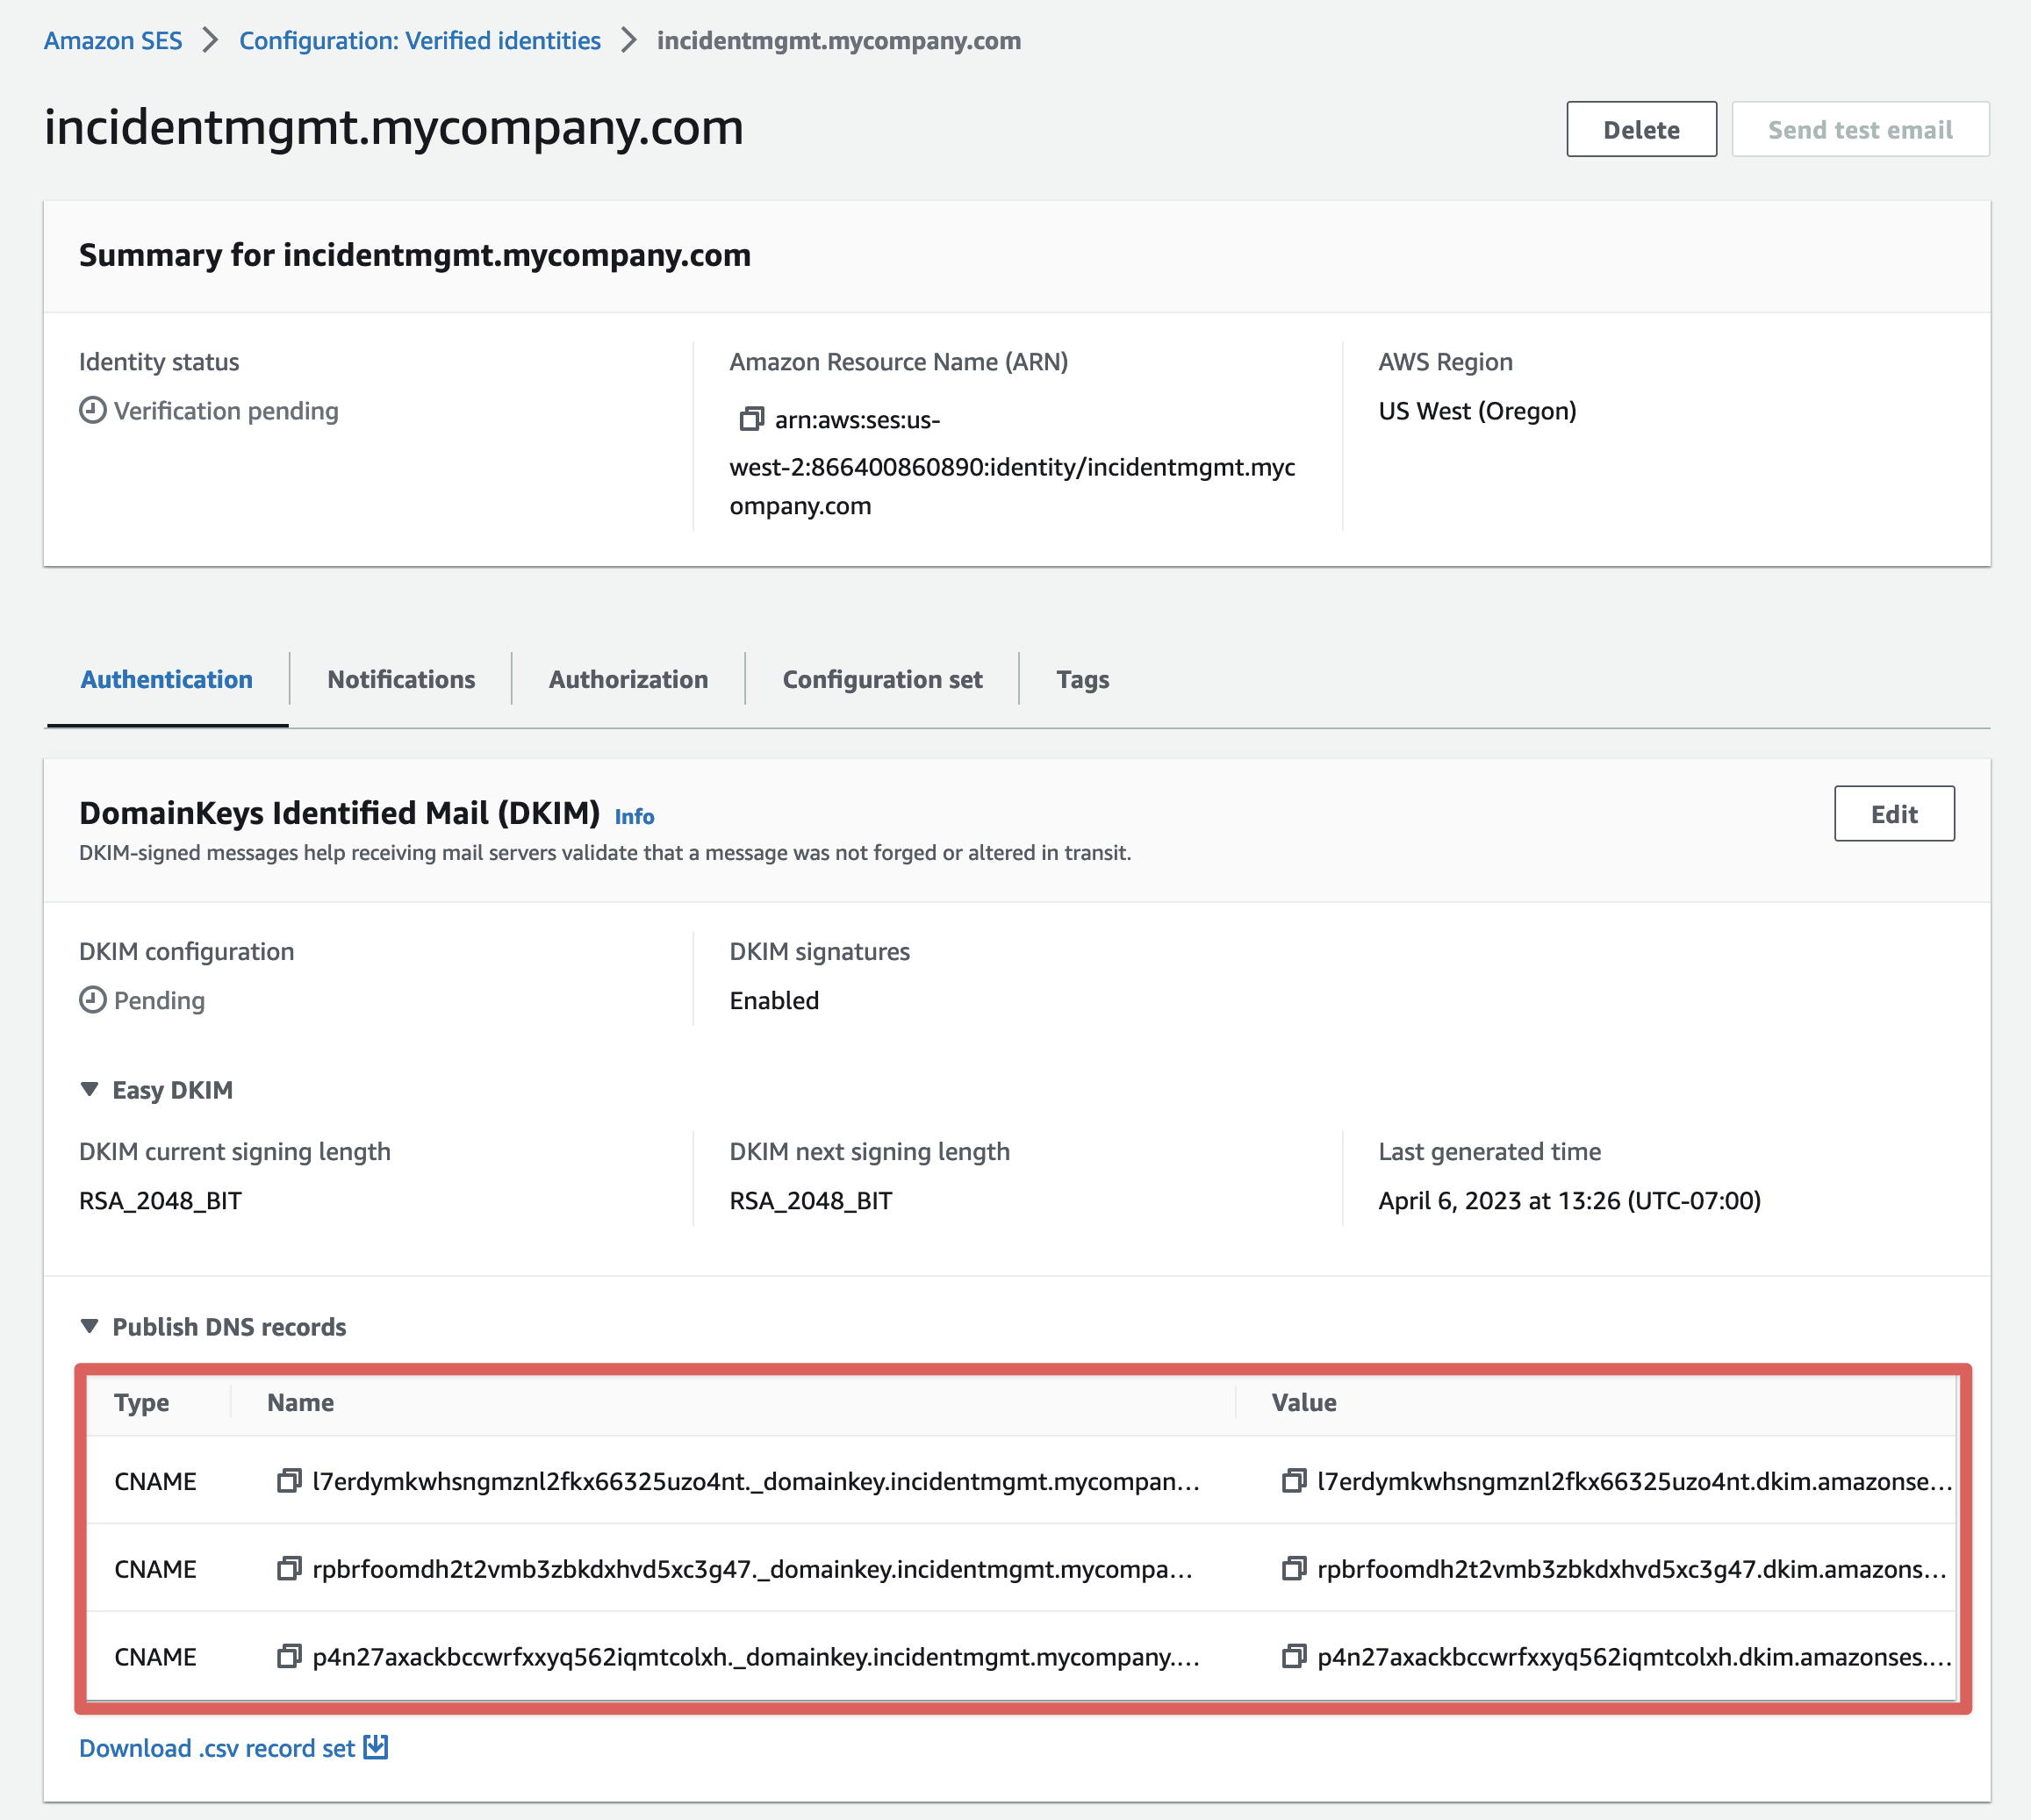
This will generate records that must be added to the DNS zone for your domain. Instructions for adding these to your DNS provider are outside the scope of this document, but be sure that you add the each of the 3 DKIM "Publish DNS records" as CNAME records on your domain.
The newly added domain identity will show as "Pending" and will not be enabled for sending until SES verifies the newly added records.
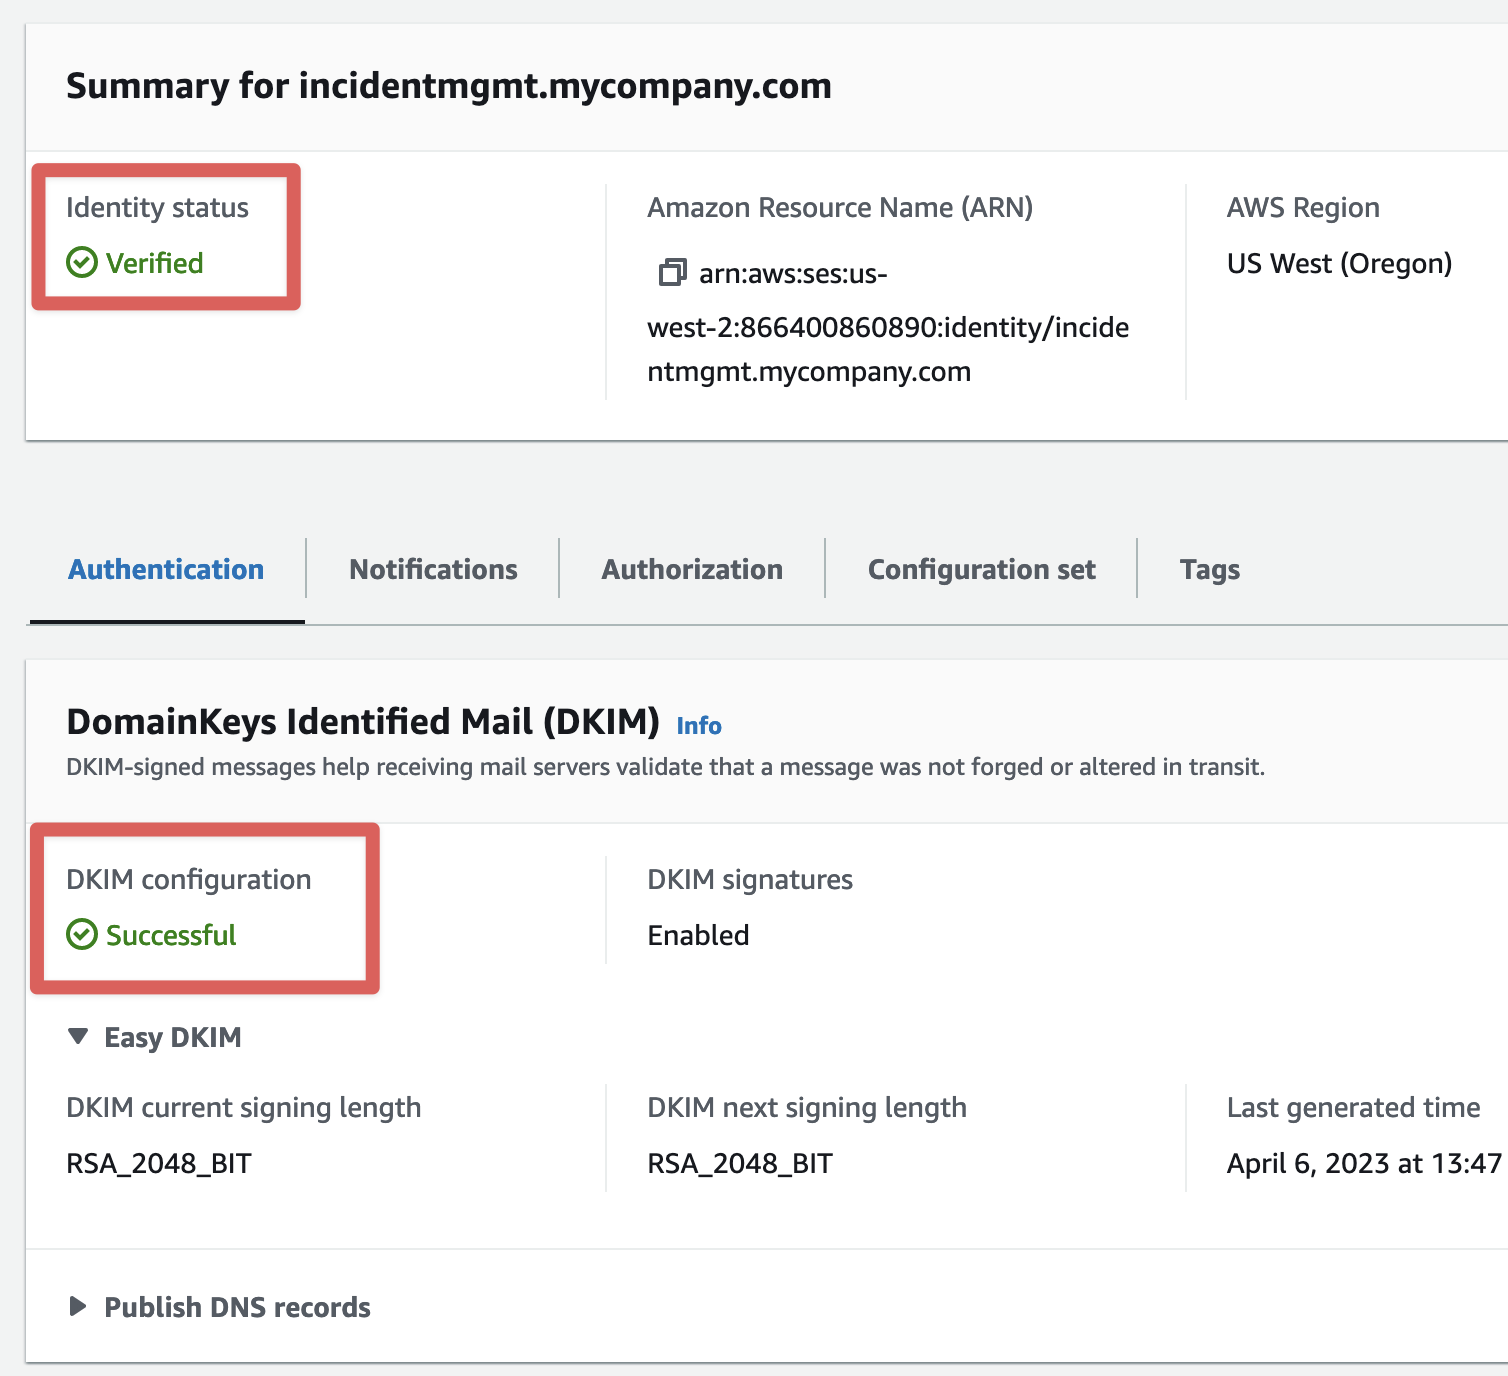
Once the "Identity status" shows as "Verified" and "DKIM configuration" shows as "Successful", your domain is successfully verified.
Configure DNS for email receiving
If you're installing to a region that supports inbound, configure the "Email Receiving Record" as an MX record so messages emailed to that domain are properly routed to SES in the desired region.
https://docs.aws.amazon.com/ses/latest/dg/regions.html#region-receive-email
Request to be moved out of "sandbox" mode
New AWS accounts must request production SES access from each region where they wish to use the service. If you see the following message, you'll need to request production access in your account. Production access must be approved and enabled for Ready Five to function properly. You can continue setup while waiting for a response from AWS Support, but won't be able to send or receive emails until then.
Ensure you've added and successfully verified a domain above before requesting production access, as AWS typically denies requests without first performing the initial validation step.
Go to the "Account Dashboard" navigation item in the SES console. Then choose "Request production access".

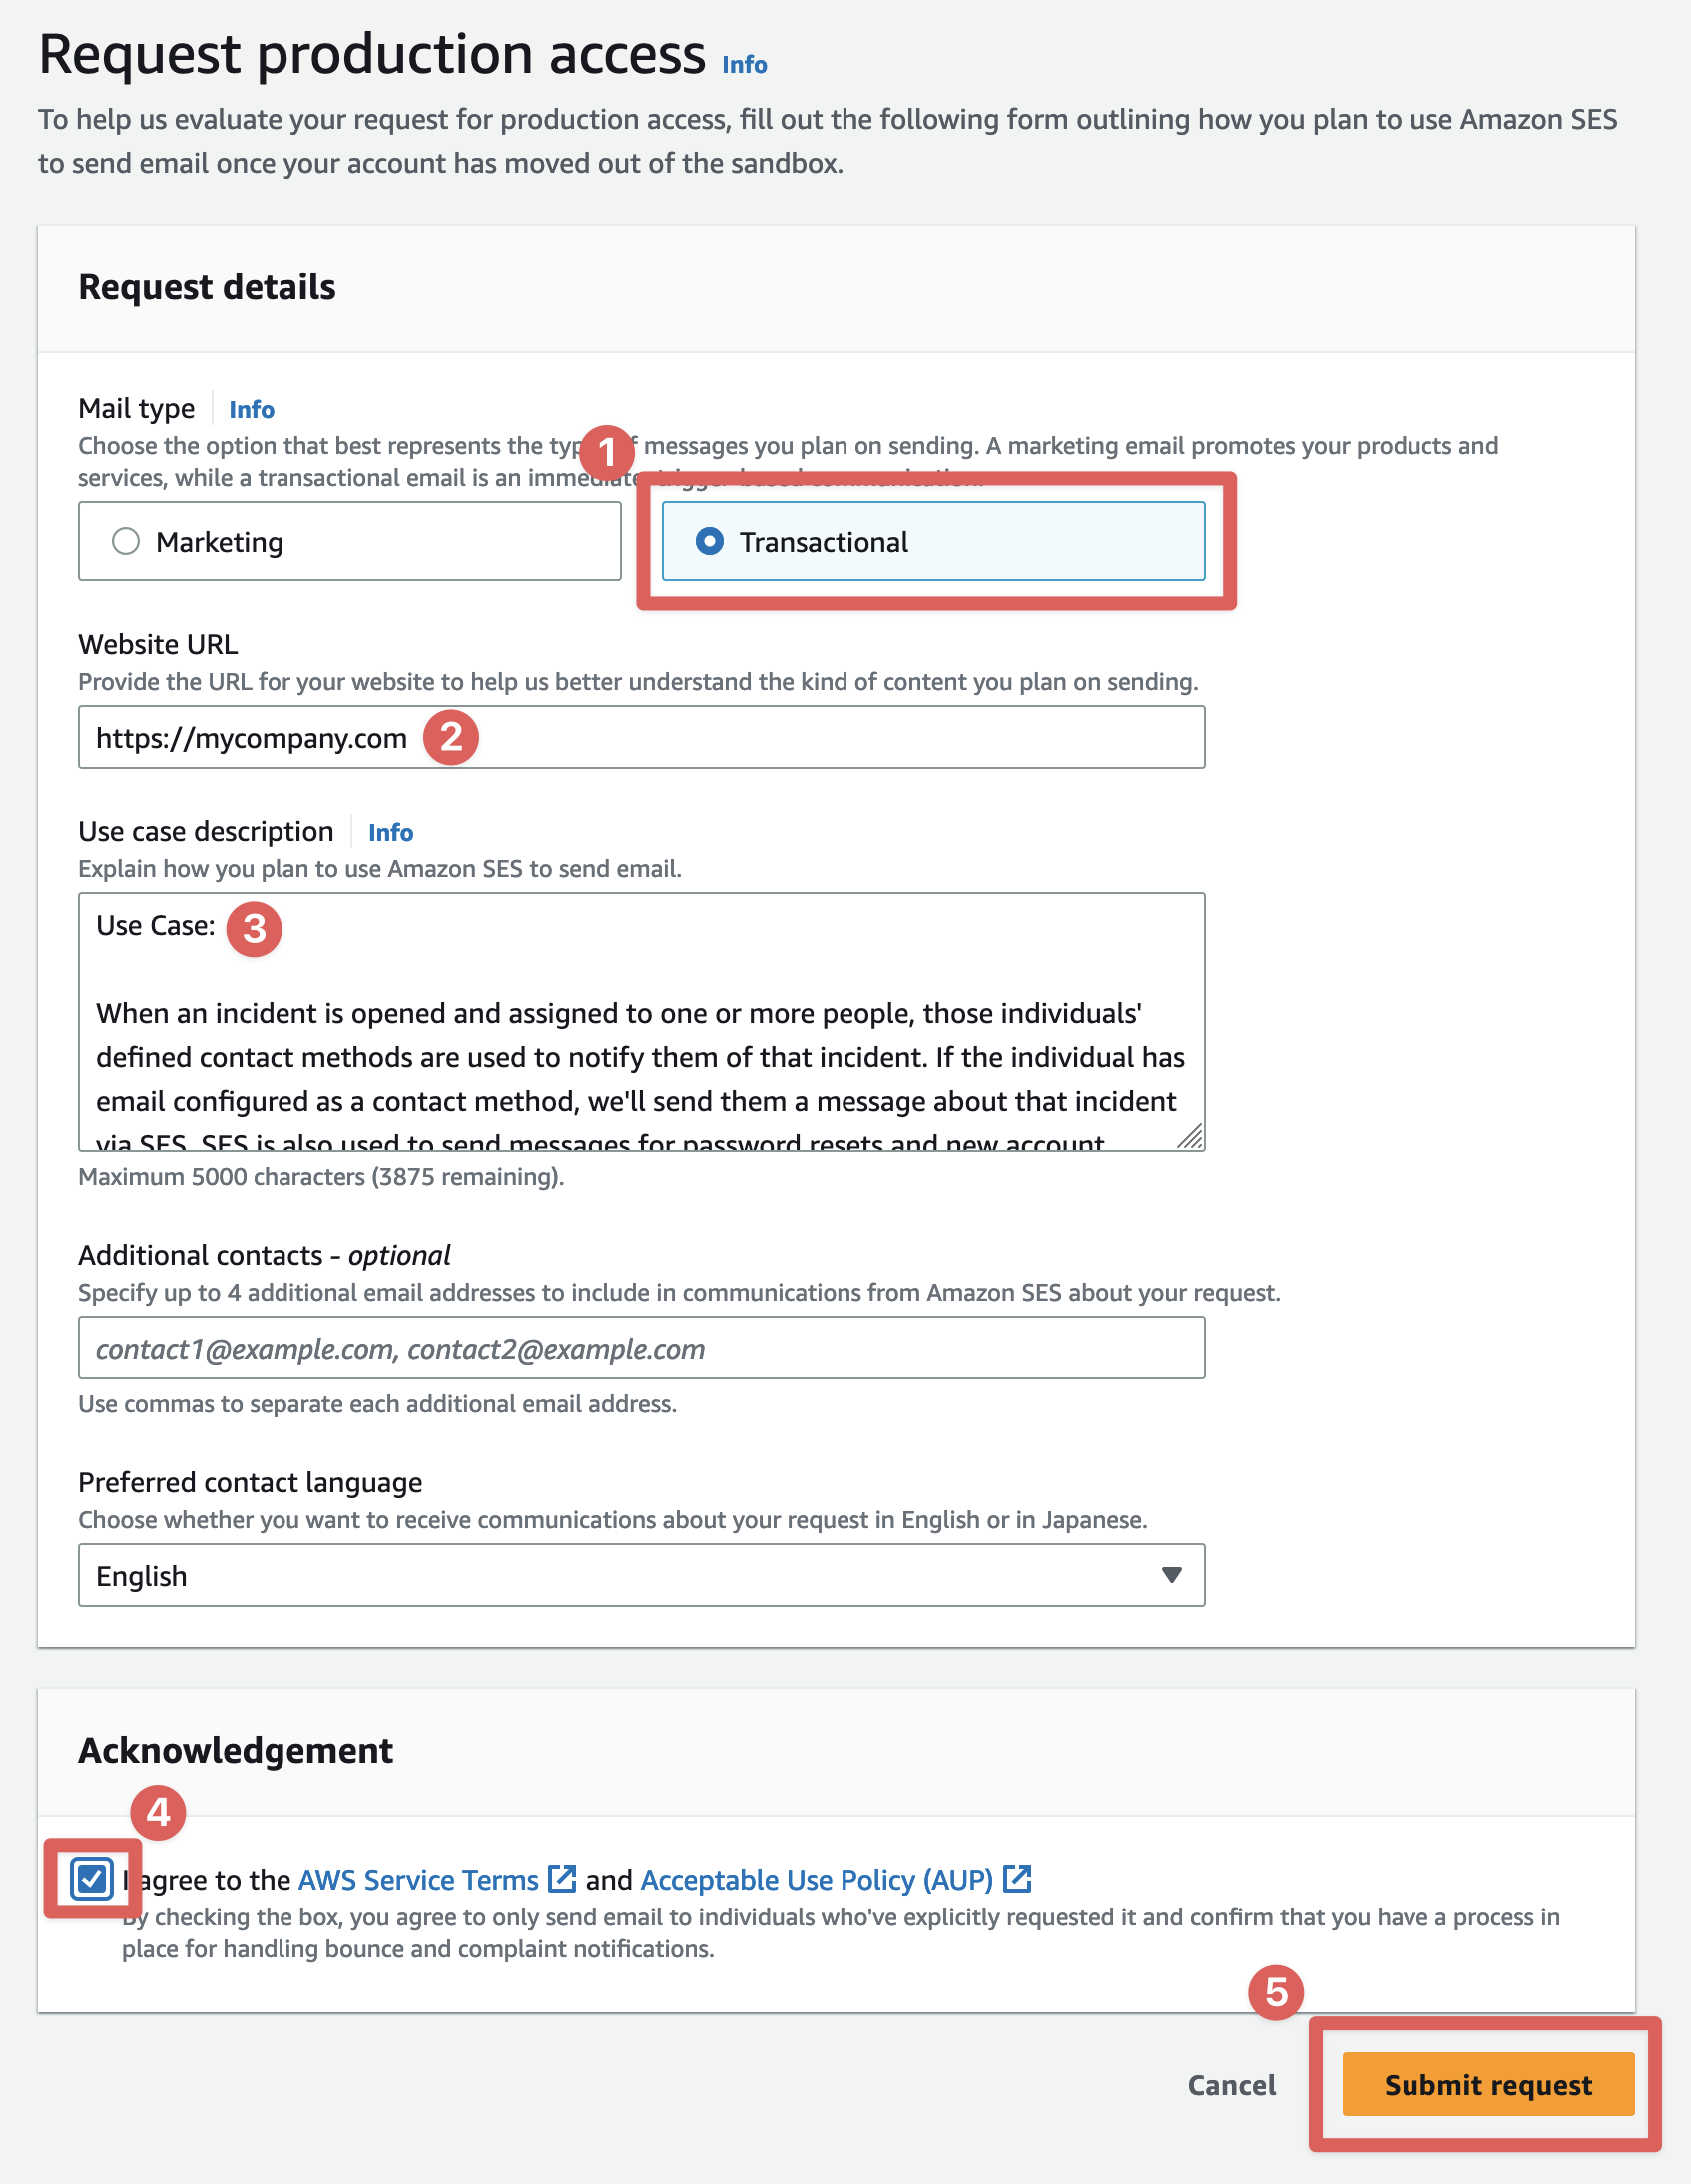
In the request form, set Enable Production Access to "Yes" and ensure that Mail type is "Transactional". For "Website URL", enter your organization's website URL.
For Use case description, we recommend copy/pasting the following text (include both the questions and the answers) as it details the use case and attempts to preempt any follow-up questions from AWS support.
Use Case:
When an incident is opened and assigned to one or more people, those individuals' defined contact methods are used to notify them of that incident. If the individual has email configured as a contact method, we'll send them a message about that incident via SES. SES is also used to send messages for password resets and new account confirmations (via Amazon Cognito).
Q: How do you plan to build or acquire your mailing list?
A: Emails are only sent internally to our employees, contractors, or volunteers. These emails are sent to these people to notify them of open incidents occurring in our systems when they have requested to be notified by email.
Q: How do you plan to handle bounces and complaints?
A: Any bounce or complaint is instantly and automatically marked as such and will not attempt future sends to that address.
Q: How can recipients opt out of receiving email from you?
A: Each user explicitly adds and removes their own email address(es) when opting in and opting out of incident notifications and can do so at any time for any reason. Opt-in and opt-out actions are applied immediately.
Check the box next to I agree to the AWS Service Terms and AUP and click "Submit request".
When you submit for review, a support ticket will be opened on your behalf to request this change and AWS will respond within a few hours.
